Error – This File Must Be Converted with BinHex 4.0

From the Help Desk file…

Reported issue: Client can’t open an email attachment.
Attachment name: MessedUp.xls (file name changed for jocularity)
Details: When you try to open the attachment, Excel pops up the error message:

“The file you are trying to open, ‘MessedUp.xls’, is in a different format than specified by the extension.  Verify that the file is not corrupted and is from a trusted source before opening the file.  Do you want to open the file now?”

image

If you click “Yes” the file opens in Microsoft Excel (or Word, depending on the file extension).

The results of blindly clicking “Yes” and just plowing forward are so confusing that even Beck couldn’t make sense out of these lyrics.

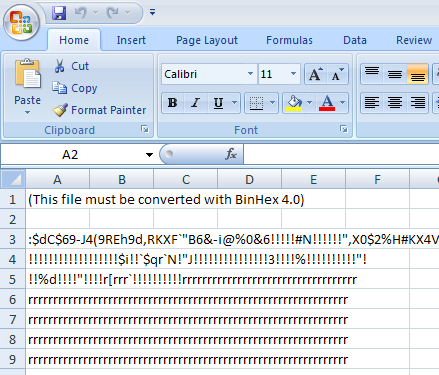
In Excel, cell A1 says:

“(This file must be converted with BinHex 4.0)”

Microsoft Excel (That ain’t no spreadsheet, bro)

(This file must be converted with BinHex 4.0)

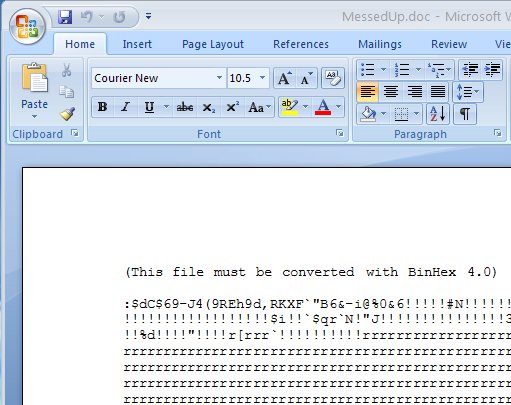
Microsoft Word (similar dreck)

image

Notepad (slight exaggeration)

matrix

What are we looking at? This is a compressed document, but in a format most folks (especially PC users) aren’t familiar with. If you Google BinHex or the error message “This file must be converted with BinHex 4.0” you’ll find everything from sites talking about TRS-80 computers to Macs.  Most of the links are dead-ends and offer no satisfaction regarding how to turn this file from garbage back into usable data. Hope, that you can easily cope with a conversion like word 2 pdf yourself.

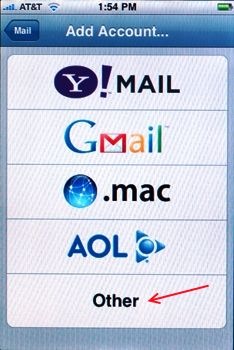
Solution: You need StuffIt Expander to expand the file.

  1. Download & install StuffIt Expander (16.7 MB)
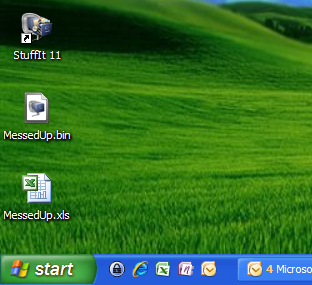
    http://www.stuffit.com/win/expander/index.html
  2. Save your attached ‘MessedUp.xls’ document to your hard drive
  3. Rename it ‘MessedUp.bin’, and choose ‘Yes’ when asked if you’re sure you want to rename the file extension.
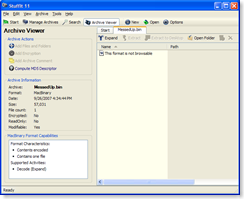
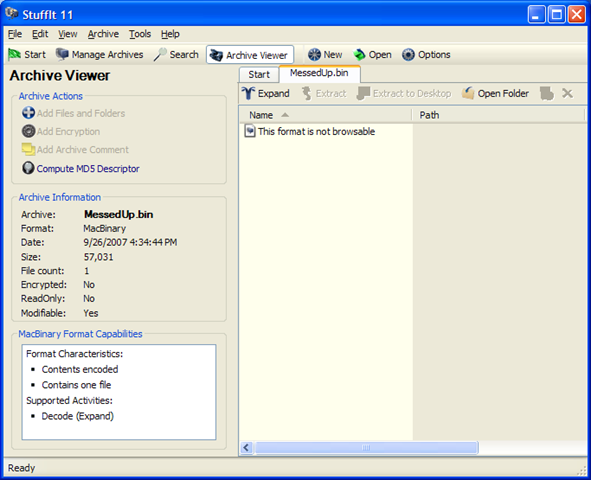
  4. Double-click your ‘MessedUp.bin’ file, it should now open in StuffIt.
  5. Click the “Expand” button (shown in the picture).image
  6. Select where you’d like your expanded file to be saved, and click OK.
  7. You should now have a sufficiently un-rubbled .XLS spreadsheet or .DOC document.  You can delete the original ‘MessedUp.bin’ file.  Grab that cup of Joe and take a victory-sip!

image

Postmortem: Why does this happen? In this particular instance, the file attachment was sent by a Mac user to a Windows PC user.  It’s not entirely clear if the renaming of the file extension was intentional or an accident, but the end result is similar to the AOL MIME email attachments back before Y2K (those were heady days 😉

Best Practice: If you’re sending an email attachment to someone on a different platform, you may avoid some headaches by just zipping the attachment instead of dragging it in the native format into your email client.

VN:F [1.9.20_1166]
Rating: 5.5/10 (4 votes cast)

Installing WSS v3 on a Member Server in an SBS Network

Windows SharePoint ServicesIf you’ve got a member server in your SBS network (especially if that server is a beefy SQL box) it may make sense from a performance standpoint to install Windows SharePoint Services version 3 on the member server instead of directly on the SBS box.  This is actually a pretty straight-forward process, but in case you’re not totally comfortable with WSS v3 yet, the procedure is documented below using a combination of a Microsoft e-book and the WSS on SBS instructions Chad came up with for SBS. 

Note:  This free WSS v3 e-book is NOT the whitepaper Chad mentions in his article.  This is a digital book: "Deployment for Windows SharePoint Services 3.0 Technology". (189 pages – published May 2007)

There are two downloads on the page (the second is for an upgrade scenario).  Choose the first install (1.1 MB).

Once you’ve downloaded the Deployment e-book, jump to page 23:

  1. Install Internet Information Server (IIS) 6.0 from the Windows Server 2003 CD 1.
  2. Disable "Run WWW server in IIS 5.0 isolation mode"
  3. Install .NET 3.0
  4. Enable ASP.NET v2.0.50727
  5. Install WSS v3

    (Select Advanced Install, Select Stand-Alone server type, Choose your data location)

  6. Run the SharePoint Products and Technologies Configuration Wizard.

    (This may require a restart of the services IIS, SharePoint Administration Service and SharePoint Timer Service.)

  7. The default web site will be http://servername/default.aspx
    Credentials to access the site should be in the format DOMAIN\user_name and the normal domain password.

    >>This is where we switch from the Microsoft e-book to Chad Gross’ "Companyweb & SharePoint v3 – Part 4" instructions <<

  8. Following Chad’s original instructions in WSS v3 Part 4, starting with "(insert cheesy on hold music . . . )"

    Login to the SBS server and create the new Host (A) record for http://intranet that points to the private IP address of your member server, and be sure to create the associated pointer (PRT) record.

  9. Follow the rest of Chad’s instructions on that page to extend the default site to http://intranet (you may have to delete the ":80" port from the URL at the bottom of the configuration page so the final URL is http://intranet and not http://intranet:80)

    >> Now leaving Chad’s instructions <<
     

  10. If you refresh IIS you’ll notice that the SharePoint – 80 default site is gone.  However, your old "Default Web Site" (the http://servername) is still there.
  11. Right-click the Default Web Site, click Properties, click the Home Directory tab, select the "A redirection to a URL" radio button, in the ‘Redirect to:’ text box type "http//intranet". Click OK.

    image

  12. Right-click the Default Web Site and start it.
  13. Now http://servername and http://intranet should both take you to http://intranet (be sure to test it from your SBS box as well).  If the link isn’t working, make sure you flushed your DNS cache in step 8 above.
  14. Login to your http://intranet site, click Site Actions / Site Settings / Title, description, and icon / rename your site "Intranet"
  15. Download and deploy your templates from the Fabulous 40 collection. Be sure to read the readme.txt enclosed in that download.
  16. Last, but certainly not least – BACKUP!!

    Chad mentions backing up your old WSS v2 http://companyweb site in Part 3, but the stsadm for WSS v3 is located in a different position, namely:

    – WSS v2 uses ..\60\bin
    – WSS v3 uses ..\12\bin

    The command I use to backup the WSS v3 http://intranet test site is shown below (yours will vary depending on the target location of your backup files):

Start / Run / CMD / Enter

CD C:\Program Files\Common Files\Microsoft Shared\web server extensions\12\bin <Enter>

stsadm.exe -o backup -url http://intranet -filename "E:\WSSv3Backup\intranet_backup.dat" -overwrite <Enter>

Of course, you can use the system timer to schedule that backup daily if you like. 

Once you get past getting your feet wet with WSS v3, be sure to check out the section, "Administering backup and recovery for Windows SharePoint Services 3.0 technology" on TechNet (especially if you’re running SQL as your database engine) before rolling out WSS to client sites.

VN:F [1.9.20_1166]
Rating: 0.0/10 (0 votes cast)

Microsoft is Coming to Louisville 10/02/2007

Microsoft is coming to Louisville Register today!

Tuesday October 2, 2007
Theater – Cinemark Tinseltown USA
4400 Towne Center Drive
Louisville Kentucky 40241

VN:F [1.9.20_1166]
Rating: 0.0/10 (0 votes cast)

KYSBSUG – Sept 2007 – SBS Hacks

image You are invited to attend the September 2007 Kentucky Small Business Server User Group (KYSBSUG) meeting.  This is our 43rd consecutive monthly meeting!

Title: KYSBSUG Meeting – Sept 2007
Date:  Wed Sept 19, 2007
Time:  6:30 PM Eastern
Venue:  University of Louisville – ITRC Building (Shelby Campus)
Address:  9001 Shelbyville Rd, Louisville, KY USA, 40222
Registration URL: https://www.clicktoattend.com/invitation.aspx?code=121293

Topic:  SBS Hacks

Description: 

Share your favorite SBS Hacks, tweaks, and work-arounds that make SBS really hum, and learn what everyone else is doing. 

We’ve got a handful of specific hacks & tweaks lined up, but we plan on opening up the floor to let everyone participate.  To encourage everyone to share, each registered attendee who shares their favorite hack gets a door prize!  If you’re new to SBS, this is a great chance to learn from the pros.  And even if you’re a long-time SBSer, we’ve got still some tricks you’ve never seen before!

At the end of the evening we’ll hold a drawing for ‘Best SBS Hack’ and the winner walks away with a Microsoft Polo shirt!

VN:F [1.9.20_1166]
Rating: 0.0/10 (0 votes cast)

Using an iPhone with SBS 2003

iphone_emailYes, you’re on the right blog. Don’t freak.

Not too long ago, a customer with a shiny new iPhone called and wanted to get it hooked up to their Small Business Server 2003 server.  No biggie, right?  Well, POP3 is one thing, but little did I know then that IMAP on SBS with an iPhone was pretty much uncharted territory. 

It took a fair amount of research, lots of experimentation, plenty of help from
Eriq Neale [SBS-MVP], and an enormous amount of patience since the client with the phone was 500 miles away and we were doing this blind.  (Yikes!)

I’m happy to report that the iPhone does work with SBS using IMAP with SSL.
(Although Windows Mobile 5 or 6 with Small Business Server is still the preferred tool for mobile SBS Warriors).

Want to set this up for yourself?  No problemo – there are two phases:

Phase 1 – Setting up IMAP with SSL on the SBS box
(complete with screen shots).

"Configuring IMAP over SSL with SBS 2003 Standard"

Co-authors: Eriq Neale & Tim Barrett

http://www.smallbizserver.net/Default.aspx?tabid=266&articleType=ArticleView&articleId=231

As a reminder, make sure you open ports 143 (TCP) and 993 (TCP) in your firewall and forward it back to your SBS box.

These instructions are for SBS 2003 Standard.

UPDATE: Eriq has also completed the ISA version of the instructions for SBS 2003 Premium.

Phase 2 – Setting up your iPhone to work with SBS and IMAP
(complete with screen shots stolen from UW and modified).

Disclaimer: This document and what comes with it are provided as-is with blunt warning: Use at your own risk, buyer beware. You break your system; you own the resolution as well. We have no liability for what you do, or can’t do, or fail to do with this information. Your entire protection is to start over again with a protected backup, or from protected system. If you don’t want to accept this idea, please don’t use this document.

Create a New Account in iPhone Mail

  1. Select Settings on the home screen

    iphone01 

  2. Select Mail to start iPhone Mail

    iphone02 

  3. Touch Add Account, select Other and then IMAP

    iphone03   iphone04  

    iphone05

  4. Fill in your account information as follows:

      Account Information:

    Name: Your Real Name
    Address: username@domain.com
    Description: SBS Email (Just a suggestion)

      Incoming Mail Server:

    Host Name: server.domain.com
    User Name: username (Not domain\username)
    Password: yourSBSpassword

      Outgoing Mail Server (SMTP):

    Host Name: server.domain.com (:587)
    User Name: username (Not domain\username)
    Password: yourSBSpassword

    This page should now look like this:

    iphone08 

  5. Touch Advanced to configure security options.

    iphone09

  6. The following screen will appear.

    iphone11 

    I used the following settings for SSL on the iPhone:

    Incoming Uses SSL – On
    Outgoing Uses SSL – On

UPDATE: Props to Levent for reminding me that you need to make sure that both ports 143 and 993 open and forwarded to the SBS box. The instructions are in the whitepaper, but I didn’t have inbound 993 turned open in my initial configuration, which is why I couldn’t get the iPhone to pull down email via IMAP with the ‘Incoming uses SSL’ turned on initially. Thanks for catching that Levent!

So there you have it.  Thanks to Eric Neale for his amazing patience and Mac & SBS know-how!  And thanks to Susan for the link. 🙂

If you have suggestions or comments, hit the feedback button below.  And before folks ask, my "Running FolderShare as a Windows Service on SBS" is coming next.

VN:F [1.9.20_1166]
Rating: 0.0/10 (0 votes cast)