Video – Seam Carving and Liquid Rescale

Seam carving is one of those new technologies that you have to see to understand.  I’ve heard this called “content-aware image resizing”, “retargeting” “rescaling”, etc., and those names fall flat. 

You really need to see this – it’s just too cool to even try to describe:

Pretty nice, eh? Wanna try it yourself?

Here are 3 examples of what you can easily do with GIMP and the Liquid Rescale plug-in.

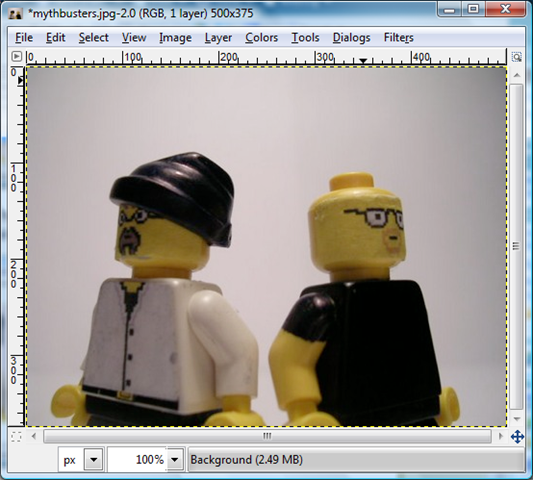
EXAMPLE 1 – Reduce Overall 25% – Mythbusters

Before (500×375 pixels)

image

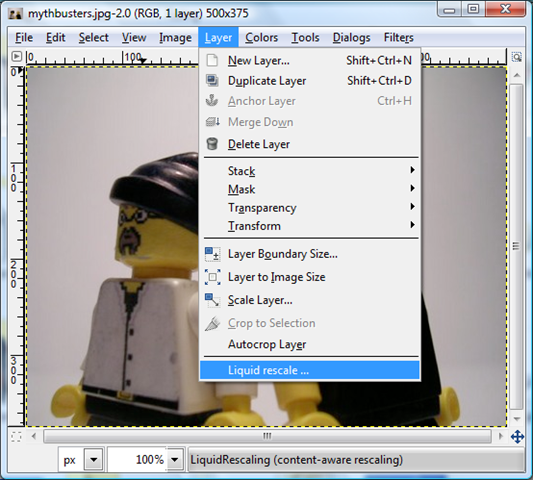
During (showing the Liquid Rescale plug-in)

image

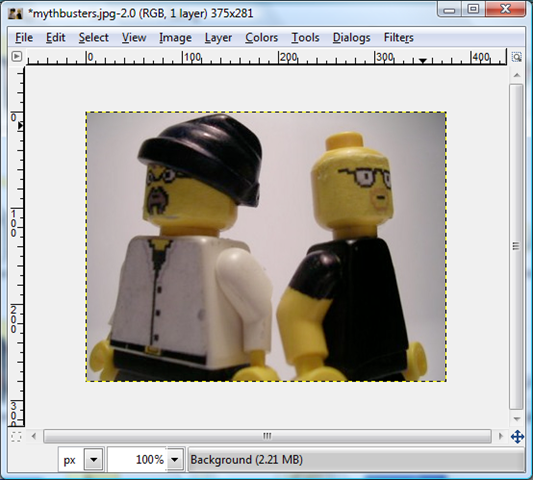
After (375×281) –  look at how much white space we lost on the top and sides of the picture. But the aspect ratio remained the same, even though Adam is a little thinner in the after picture:

image

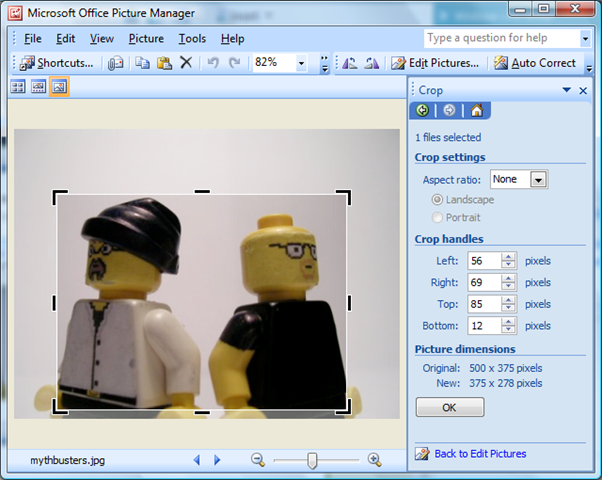
That doesn’t look significant, but look how much picture we would have lost to conventional cropping using Microsoft Office Picture Manager (the hands would be gone completely):

image

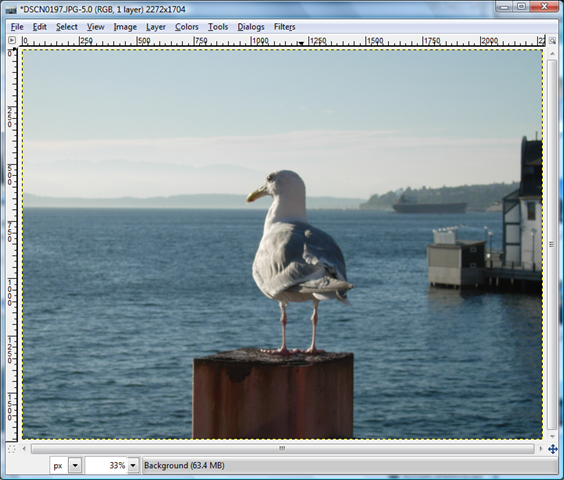
EXAMPLE 2 – Reduce Width Only by 25% – Seagull in Seattle

Before (2272×1074)

image

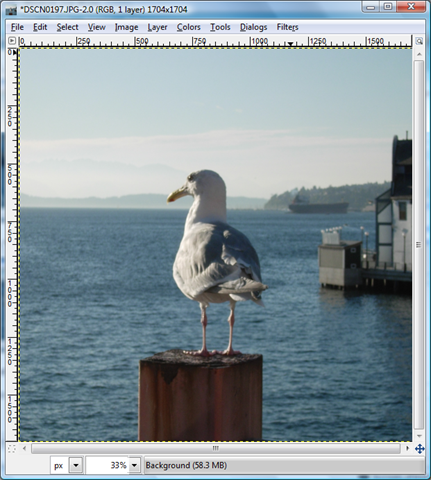
After (1074×1074) -25% width

image

After v2 (2840×1278) +25% width, -25% height

image

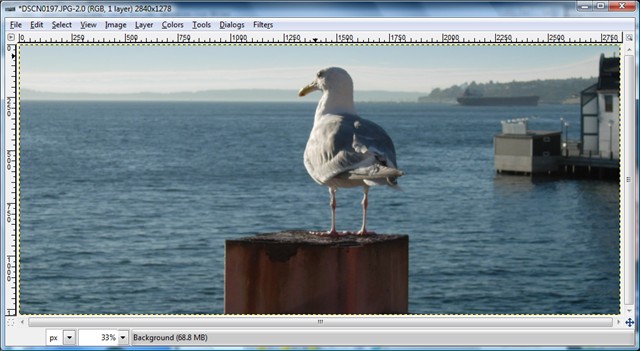
Note: These pictures were not rescale or cropped – it’s a ‘retarget’.

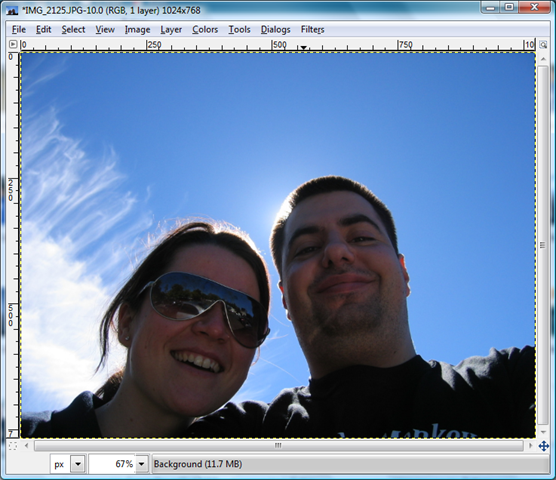
EXAMPLE 3 – Reduce Height Only by 25% – Susanne & Vlad

Before (1024×768)

image

After (1024×576) -25% height

image

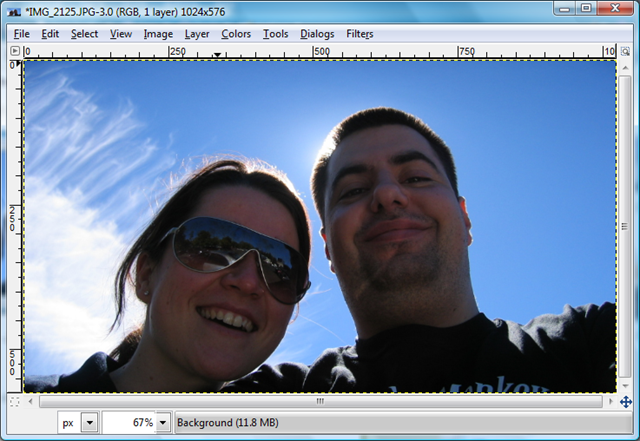
Once again, not a crop… yada yada… you get the idea.  It’s lots of fun. Enjoy!

Dr. Codec 🙂

VN:F [1.9.20_1166]
Rating: 0.0/10 (0 votes cast)

Download – Selling SBS and WSS Kit

wss_logo Title: How to Sell, Deploy, and Build Business with Microsoft Windows Sharepoint Services 3.0 and SBS 2003 R2
File Name: Selling_WSS_and_SBS_Kit.zip
Version: 1.0
Date Published: 11/15/2007
Language: English
Download Size: 3.2 MB
Download URL: Click here

Description: 
A new partner enablement tool that helps you create solutions using Windows SharePoint Services 3.0 and Windows Small Business Server 2003 R2. Access the toolkit’s resources—including a process cookbook, technical documentation and marketing materials—to learn how to build your business by selling and deploying customized solutions.

Contents Include:

  • Application Templates Overview for WSS v3
  • Asking the Client to Agree to a WSS Demo Final.doc
  • Helpful Technical Resources from Microsoft.doc
  • Identifying Potential WSS Clients.doc
  • Making WSS into a Secure Extranet.doc*
  • Preparing Your Business to Sell and Support WSS.doc
  • SBS Business Benefits Highlights.doc
  • SharePointBackups.exe
  • Site Administrator Homework Sample.doc
  • Visio Windows SharePoint Process Flows 061107.pdf
  • WSS 3.0 User Training Guide.doc
  • WSS 3.0 Admin Training Guide.doc
  • WSS 3.0 Site Demonstration Script.doc
  • WSS 3.0 Site Intake Template Starter Site.doc
  • WSS 3.0 Technical Setup.doc
  • WSS Admin Training Agenda Sample.doc
  • WSS Future Opportunities.doc
  • WSS Packaged Offering StarterSite Sample.doc
  • WSS Process Flow Steps Documents Objectives Toolkit Readiness.xls
  • WSS StarterSite Intake Template.doc
  • WSS User Training Agenda Sample.doc
  • Your Ideal Pilot Client.doc

*If you’re looking for the document on creating a secure extranet using WSS v3 on top of SBS, it’s in this download.  This is the same WSS / SBS content released at Worldwide Partner Conference 2007 that everyone has been asking for over the last several months.  Basically, this stuff is a gold mine!

VN:F [1.9.20_1166]
Rating: 0.0/10 (0 votes cast)

Microsoft is Coming to Cincinnati 11/27/2007

Microsoft is coming to Cincinnati tomorrow:

Tuesday November 27, 2007
Regal Deerfield Towne Center Stadium 16
5500 Deerfield Blvd
Mason Ohio 45040

VN:F [1.9.20_1166]
Rating: 0.0/10 (0 votes cast)

Notes from November 2007 KYSBSUG Meeting

kysbsug Thanks to everyone who attended the November 2007 Kentucky Small Business Server User Group (KYSBSUG) meeting last night on "Best Practices".

SPECIAL THANKS:

  • Thanks to all who attended, especially those traveling from Lexington.
  • Also, MAJOR thanks to Matthew Snoddy from Network Therapists for presenting!  We’re really looking forward to the Lexington SBS group launch in January!
  • And thanks to those who stayed after to attend the WHS build

GRAND PRIZE WINNER:

  • Windows Home Server Lee Johnson from Sentry Computer Systems took home the copy of Windows Home Server

    Congratulations Lee on finally winning something 😉

URLS MENTIONED LAST NIGHT:

  • SBS 2003 Best Practices Analyzer v1.3 (1.1 MB)
  • Exchange 2003 Best Practices Analyzer v2.8 (6.8 MB)
  • ISA 2004 Best Practices Analyzer v5.5 (2.8 MB)
  • WSS v3 & MOSS 2007 Best Practices Analyzer (1.4 MB)
  • Microsoft Baseline Security Analyzer v2.1 – Beta 2 (1.3 MB)
  • Visio 2007 Connector for MBSA 2.1 (1.1 MB)
  • lookinmypc LookInMyPC (1.2 MB) – LookInMyPC generates a complete, comprehensive system profile that includes information on all installed hardware and software. Additionally it provides system diagnostic information such as details on running processes, installed services, startup programs, Windows updates and hot fixes, active network and Internet connections, TCP/IP port usage, event log detail, and much more. All this is provided in an easy to read, formatted report that you can view and print using your web browser.
  • AccessEnum v1.32 (51 KB) – AccessEnum gives you a full view of your file system and Registry security settings in seconds, making it the ideal tool for helping you for security holes and lock down permissions where necessary.
  • JDiskReport JDiskReport v1.3 (0.6 MB) – JDiskReport enables you to understand how much space the files and directories consume on your disk drives, and it helps you find obsolete files and folders.

    The tool analyses your disk drives and collects several statistics which you can view as overview charts and details tables.

    This is ad-free uncrippled no-charge binary multi-platform software that never expires.  (Requires Java).

  • The Dude 2.2 The Dude v2.2 (1.8 MB)  – The Dude is a network monitor that will enable you to scan all the devices within a network subnet and then draw a map of the network devices and tell you where your workstations are connected and warn you of service problems.

    Better still, your network doesn’t need to be internal. If your company has a network between offices, The Dude will enable you to map the entire network.

  • PsEXec v1.9 (1 MB) – PsExec, from Microsoft / Sysinternals is a light-weight telnet-replacement that lets you execute processes on other systems, complete with full interactivity for console applications, without having to manually install client software. PsExec’s most powerful uses include launching interactive command-prompts on remote systems and remote-enabling tools like IpConfig that otherwise do not have the ability to show information about remote systems.

    Note: some anti-virus scanners report that one or more of the tools are infected with a "remote admin" virus. None of the PsTools contain viruses, but they have been used by viruses, which is why they trigger virus notifications.

  • SIW - System Information for Windows 
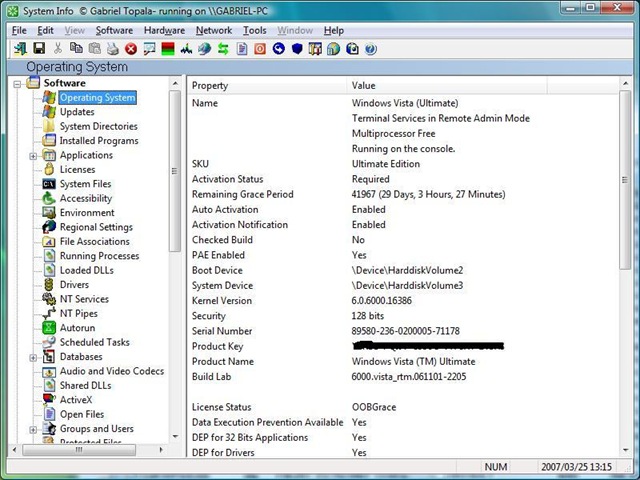
System Information for Windows (SIW) v1.71 (1.3 MB) – SIW is an advanced System Information for Windows tool that gathers detailed information about your system properties and settings and displays it in an extremely comprehensible manner.

    This standalone utility does not require installation (Portable Freeware) – one less installed program on your PC as well the fact that you can run the program directly from an USB flash drive, from a floppy, from a network drive or from a domain login script.

VN:F [1.9.20_1166]
Rating: 0.0/10 (0 votes cast)

Installing WSS v3 on a Member Server in an SBS Network

Windows SharePoint ServicesIf you’ve got a member server in your SBS network (especially if that server is a beefy SQL box) it may make sense from a performance standpoint to install Windows SharePoint Services version 3 on the member server instead of directly on the SBS box.  This is actually a pretty straight-forward process, but in case you’re not totally comfortable with WSS v3 yet, the procedure is documented below using a combination of a Microsoft e-book and the WSS on SBS instructions Chad came up with for SBS. 

Note:  This free WSS v3 e-book is NOT the whitepaper Chad mentions in his article.  This is a digital book: "Deployment for Windows SharePoint Services 3.0 Technology". (189 pages – published May 2007)

There are two downloads on the page (the second is for an upgrade scenario).  Choose the first install (1.1 MB).

Once you’ve downloaded the Deployment e-book, jump to page 23:

  1. Install Internet Information Server (IIS) 6.0 from the Windows Server 2003 CD 1.
  2. Disable "Run WWW server in IIS 5.0 isolation mode"
  3. Install .NET 3.0
  4. Enable ASP.NET v2.0.50727
  5. Install WSS v3

    (Select Advanced Install, Select Stand-Alone server type, Choose your data location)

  6. Run the SharePoint Products and Technologies Configuration Wizard.

    (This may require a restart of the services IIS, SharePoint Administration Service and SharePoint Timer Service.)

  7. The default web site will be http://servername/default.aspx
    Credentials to access the site should be in the format DOMAIN\user_name and the normal domain password.

    >>This is where we switch from the Microsoft e-book to Chad Gross’ "Companyweb & SharePoint v3 – Part 4" instructions <<

  8. Following Chad’s original instructions in WSS v3 Part 4, starting with "(insert cheesy on hold music . . . )"

    Login to the SBS server and create the new Host (A) record for http://intranet that points to the private IP address of your member server, and be sure to create the associated pointer (PRT) record.

  9. Follow the rest of Chad’s instructions on that page to extend the default site to http://intranet (you may have to delete the ":80" port from the URL at the bottom of the configuration page so the final URL is http://intranet and not http://intranet:80)

    >> Now leaving Chad’s instructions <<
     

  10. If you refresh IIS you’ll notice that the SharePoint – 80 default site is gone.  However, your old "Default Web Site" (the http://servername) is still there.
  11. Right-click the Default Web Site, click Properties, click the Home Directory tab, select the "A redirection to a URL" radio button, in the ‘Redirect to:’ text box type "http//intranet". Click OK.

    image

  12. Right-click the Default Web Site and start it.
  13. Now http://servername and http://intranet should both take you to http://intranet (be sure to test it from your SBS box as well).  If the link isn’t working, make sure you flushed your DNS cache in step 8 above.
  14. Login to your http://intranet site, click Site Actions / Site Settings / Title, description, and icon / rename your site "Intranet"
  15. Download and deploy your templates from the Fabulous 40 collection. Be sure to read the readme.txt enclosed in that download.
  16. Last, but certainly not least – BACKUP!!

    Chad mentions backing up your old WSS v2 http://companyweb site in Part 3, but the stsadm for WSS v3 is located in a different position, namely:

    – WSS v2 uses ..\60\bin
    – WSS v3 uses ..\12\bin

    The command I use to backup the WSS v3 http://intranet test site is shown below (yours will vary depending on the target location of your backup files):

Start / Run / CMD / Enter

CD C:\Program Files\Common Files\Microsoft Shared\web server extensions\12\bin <Enter>

stsadm.exe -o backup -url http://intranet -filename "E:\WSSv3Backup\intranet_backup.dat" -overwrite <Enter>

Of course, you can use the system timer to schedule that backup daily if you like. 

Once you get past getting your feet wet with WSS v3, be sure to check out the section, "Administering backup and recovery for Windows SharePoint Services 3.0 technology" on TechNet (especially if you’re running SQL as your database engine) before rolling out WSS to client sites.

VN:F [1.9.20_1166]
Rating: 0.0/10 (0 votes cast)

KYSBSUG – Sept 2007 – SBS Hacks

image You are invited to attend the September 2007 Kentucky Small Business Server User Group (KYSBSUG) meeting.  This is our 43rd consecutive monthly meeting!

Title: KYSBSUG Meeting – Sept 2007
Date:  Wed Sept 19, 2007
Time:  6:30 PM Eastern
Venue:  University of Louisville – ITRC Building (Shelby Campus)
Address:  9001 Shelbyville Rd, Louisville, KY USA, 40222
Registration URL: https://www.clicktoattend.com/invitation.aspx?code=121293

Topic:  SBS Hacks

Description: 

Share your favorite SBS Hacks, tweaks, and work-arounds that make SBS really hum, and learn what everyone else is doing. 

We’ve got a handful of specific hacks & tweaks lined up, but we plan on opening up the floor to let everyone participate.  To encourage everyone to share, each registered attendee who shares their favorite hack gets a door prize!  If you’re new to SBS, this is a great chance to learn from the pros.  And even if you’re a long-time SBSer, we’ve got still some tricks you’ve never seen before!

At the end of the evening we’ll hold a drawing for ‘Best SBS Hack’ and the winner walks away with a Microsoft Polo shirt!

VN:F [1.9.20_1166]
Rating: 0.0/10 (0 votes cast)

Hack – Removing the Annoying Dell Wallpaper in RDP

This annoyance has been around for a very long time, and it’s been covered in numerous places throughout the web.   But since it still exists and since I came across it twice today, I thought I’d post the fix here.

The annoyance in question is the factory wallpaper from Dell (or any other manufacturer) that fills the screen when you try to logon to RDP.  It is slow, annoying, and it looks like this…

I pick on Dell not because we’re primarily an HP shop, but because that stupid Dell wallpaper weighs in at 1,877 KB.  That’s more than entire floppy disk of data – just for a splash screen!

Here’s how to get rid of the factory wallpaper or splash screen background.  But first, the obligatory REGEDIT disclaimer:

Disclaimer:  Use Registry Editor at your own risk. If you use Registry Editor incorrectly, you can cause serious problems that may require you to reinstall your operating system. This information is provided on an “as is” basis and all risk is with you. Improper use of Regedit can also make you sterile.  NoGeekLeftBehind makes no warranties, express, implied or statutory, as to any matter whatsoever, and does not guarantee that problems that you cause by using Registry Editor incorrectly can be resolved.

With that out of the way, there are two options available:

a) Kill that splash screen wallpaper completely. 

b) You can replace the factory image with another wallpaper.

If you’re leaning towards ‘option b’, I’ve included two images you can right-click and Save-As that are tiny (only 102 bytes each):

 – white_10x10.bmp
 – black_10x10.bmp

On with the instructions…

RDP Splash Screen Wallpaper Removal Instructions:

1) Click Start / Run / type REGEDIT and click OK

2) Navigate EXACTLY to the Key Value 
 – HKEY_USERS
 – .DEFAULT
 – Control Panel
 – Desktop

3) Locate the String Value:  “Wallpaper”. 

Note: If you’re using a Dell, that string value data is probably “\windows\system32\DELLWALL.BMP”

Screenshot of the String Value above (click to enlarge)

4) Now, either:
  a) right-click and delete the Wallpaper string value completely, or 
  b) change the value to a different wallpaper

   WARNING – Be sure you DO NOT delete the “Desktop” Registry Key on the left, only nuke the “Wallpaper” String Value on the right

5) Close REGEDIT

If you performed everything correctly, the next time you RDP into the server that wallpaper should be gone (or changed if you followed Step 4b).  Your Remote Desktop Protocol experience should be much improved now.

VN:F [1.9.20_1166]
Rating: 8.7/10 (6 votes cast)

Last Call for Exam Palooza

The 30% discount on training vouchers for the SBSC, WSS and MOSS Exams is almost over – this opportunity ends June 1, 2007!

Details after the jump: Exam Palooza Promotion

Credit:  Ron Grattopp – Microsoft TS2

VN:F [1.9.20_1166]
Rating: 0.0/10 (0 votes cast)

Certified Technology Specialist Promo

Tin ParkhouseI got this information from Tina Parkhouse on the TS2 team today and I’m passing it along to everyone. 🙂 You are invited to participate in the Microsoft Certified Technology Specialist promotion to become a Microsoft Certified Technology Specialist (MCTS). The first 250 partners that are ready to take a Microsoft Certified Technology Specialist (MCTS) exam will receive a free Exam voucher good for one free exam and a retake.  Exam vouchers expire on June 29, 2007.  

Next steps to follow if you are ready to take the MCTS exam:  

  • Send a mail to uspr@asentus.net with your Partner ID and along with this code TS2LOU to receive your Exam Promotion code.  

  • Discounted instructor-led training is also available for partners that need training prior to taking a certification exam through www.msreadiness.com/partnerskillsplus.  

  • Exams and classes are available everywhere in the U.S and must be taken by June 30th  

  • Once you pass your exam, send a copy of the exam to uspr@asentus.net and you will receive a polo shirt (one shirt per partner org)

If you are not quite ready to take the exam and need additional training, follow these steps:  

  • Go to: www.msreadiness.com/partnerskillsplus for a list of  discounted classes available and enter promo code TS2MKT when you register for the class.   

  • Once you are ready to take the exam, just follow the steps above.    

What are the current certifications available?
The Technology Specialist certifications enable professionals to target specific technologies and to distinguish themselves by demonstrating in-depth knowledge and expertise in their specialized technologies. Microsoft Technology Specialists are consistently capable of implementing, building, troubleshooting, and debugging a particular Microsoft technology.
There are currently 17 Microsoft Certified Technology Specialist (MCTS) certifications. More will become available as new technologies are introduced. 
The 17 MCTS certifications are as follows:

I hope you are able to take advantage of this promotion!  

VN:F [1.9.20_1166]
Rating: 0.0/10 (0 votes cast)

Adding Macs to a Windows Vista Workgroup

Back in January at the EVO Launch in Louisville I met a ton of new people.  One of them was Erik Eckel from Computer Troubleshooters (super-nice guy!) 

Erik recently had an article published on TechRepublic (April 6, 2007) that I’d like to share with everyone who works in smaller Windows networks that include Macs.

This article provides step-by-step instructions on how to add Macs to a Windows Vista Workgroup.    This article is a great reference with screen shots, and it’s well worth reading and bookmarking.  Saving it as a PDF is probably a good idea too, and you can do that right from the TechRepublic site.

When I met Erik, I had no idea just how prolific a writer he really is.  You can check out Erik’s bio and other articles (over 300 of them) on TechRepublic here.

Nicely done Erik!

P.S.  He’s also got an article on how to add Windows Vista machines into a Mac network.

VN:F [1.9.20_1166]
Rating: 0.0/10 (0 votes cast)