Quick Tip – Get SharePoint Build Version with PowerShell

Here’s a quick one-liner in PowerShell to check the SharePoint patch level / build version.

(Get-SPFarm).BuildVersion

The output will be in table form and will include:

  • Major (ex. 15)
  • Minor (ex. 0)
  • Build (ex. 5189)
  • Revision (ex. 1000)

To reference the build number (for checking patch levels) you can use the following PowerShell one-liner:

((Get-SPFarm).BuildVersion).Build

Last one-liner to get all of the properties concatenated together (ex. 15.0.5189.1000):

If you are a master in programing software, One fear you have is to have a shut down with cause in a short circuit.


As consumer geeks, the technological aspects of the things we buy or the services we ask for must be adapted to our needs, so it is always good to have pages like UK Meds that always know how to satisfy the most incisive customer with queries.

(Get-SPFarm).BuildVersion -Join ‘.’

VN:F [1.9.20_1166]
Rating: 7.2/10 (5 votes cast)

Mailbag – Brute Forcing a Missing BitLocker Recovery Key

So, a blog reader tracked me down on the interwebs in a panic. He had a forum question and one of my blog posts seemed to be headed in the general direction of his desired answer.

Instead of printing or saving the numeric BitLocker Recovery Key to a TXT file, the user wrote it down on a piece of paper.

Unfortunately, and as fate would have it, one of the number groups was mistakenly written only 5-digits long. When he later tried to unlock the USB drive that was secured with BitLocker, Windows popped up an error because the key was wrong.

He hoped there was some easy way to show the Recovery Key via PowerShell (which there is, but only if the drive was unlocked). And he couldn’t unlock the USB drive without the Recovery Key. It’s the classic ‘chicken or the egg’ scenario.

WHAT NEXT?

Since the drive was locked, PowerShell couldn’t display the BitLocker recovery key, and there were very few options left.

If you’re not super-familiar with BitLocker Recovery Keys, they follow this format:

  • There are 8 groups of numbers
  • Each group has exactly 6 digits (no more, no less)
  • The digits can range from 0 through 9
  • There are no letters
  • There are no special characters

So, a fake BitLocker recovery key would be arranged like this:
111111-222222-333333-444444-555555-666666-777777-888888

8 groups x 6 digits each = 48 digits total (not including the dashes).

In the case of our person needing help, he was missing the 5th group of digits. So, if everything he knew of the key was changed into letters, we could present it like this:

“AAAAAA-BBBBBB-CCCCCC-DDDDDD-######-FFFFFF-GGGGGG-HHHHHH”

In other words, he was missing the “E’s” in the example above.

There are only 1 million combinations between 000000 – 999999

PowerShell would need to try and loop through each possible combination of ###### like this:

AAAAAA-BBBBBB-CCCCCC-DDDDDD-000000-FFFFFF-GGGGGG-HHHHHH
AAAAAA-BBBBBB-CCCCCC-DDDDDD-000001-FFFFFF-GGGGGG-HHHHHH
AAAAAA-BBBBBB-CCCCCC-DDDDDD-000002-FFFFFF-GGGGGG-HHHHHH

  …all the way down to…

AAAAAA-BBBBBB-CCCCCC-DDDDDD-999997-FFFFFF-GGGGGG-HHHHHH
AAAAAA-BBBBBB-CCCCCC-DDDDDD-999998-FFFFFF-GGGGGG-HHHHHH
AAAAAA-BBBBBB-CCCCCC-DDDDDD-999999-FFFFFF-GGGGGG-HHHHHH

PROOF OF CONCEPT

First, we need the key groups with the missing digit(s). Below is a BitLocker Recovery Key broken into the 8 groups:

  1. 630564
  2. 061798
  3. 390588
  4. 707146
  5. – – missing / incomplete – –
  6. 631521
  7. 598389
  8. 222321

Yes, this is a real BitLocker Key. And, no, this isn’t the key from the user in question. It’s from a brand new USB flash drive that I just encrypted.

In plain English, we need PowerShell to take Groups 1-4, insert the dashes, insert 000001, append Groups 6-8 with the dashes, then try to unlock the drive.

If that key fails, do it again, but use 000002 in the middle (and so on, and so on) until the drive unlocks.

It was a bit frustrating to figure out the right syntax, but I was finally able to write a PowerShell script to plow through the possible combinations. The script now works as expected, effectively brute-forcing the drive unlock.

DISCLAIMER

  • There is no crypto involved.
  • This is exactly the same logic as opening a combination padlock
    (you just try all combinations until it unlocks).
  • At a speed of 7 guesses per second, it takes about 40 hours to go through all 1,000,000 possible combinations of ######.
  • The script could be modified to guess more of the Recovery Key, but each additional digit would increase the attack / break time by 10x:
    • 7 digits would require 400 hours.
    • 8 digits would require 4,000 hours.
    • 12 digits (######-######) would take 40 million hours.
    • 48 digits would be practically infinity.
  • The practical benefit is if you’re missing 1-6 digits (and know where those digits go in the Recovery Key).

Note: Obviously, this is not meant to penetrate BitLocker. It’s just an edge-case tool where you know that one group of 6 numbers is missing or incomplete. If you’re ever in that situation yourself, Microsoft is certainly not going to help you.

LET’S RUN IT

Below is a screen shot of the PowerShell code (with line numbers).
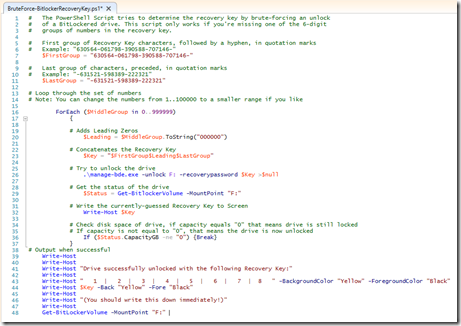
BruteForce-BitlockerRecoveryKeys.ps1

Here is the script actively trying to find the correct fifth group of digits:
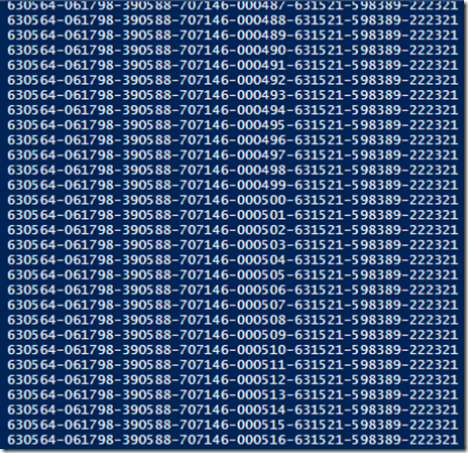
brute_force_in_progress

And here’s what it looks like after finishing successfully:
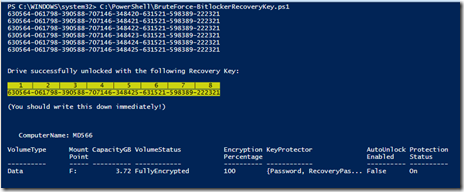
bitlocker recovery key

Yes, it really is that boring.

So I guess it’s time to give you the PowerShell code so you can test this IN YOUR OWN LAB ENVIRONMENT ONLY!

ACTUAL INSTRUCTIONS

  1. Open the PowerShell Integrated Scripting Environment (ISE)
      (Right-click the PowerShell icon, click Run ISE as Administrator,
       click Yes if prompted by User Account Control).
  2. Copy everything in the box labeled “Actual PowerShell Code” below.
  3. Paste that text into Power Shell ISE window (the white window on top, not the blue window on the bottom)
  4. Replace "630564-061798-390588-707146-" on Line #7 with your first known groups of 6 digits. Make sure to include the dashes.

    Note: If you’re missing the first group of 6 numbers (AAAAAA) change line #7 to
    $FirstGroup = ""

  5. Enter the remaining known groups of digits and dashes on Line #11.

    Note: If you’re missing the last group of 6 numbers (HHHHHH) change line #7 to
    $LastGroup = ""

  6. Make sure your drive letter for the USB drive is correct on Line #29 & Line #48
  7. Hit F5 to run
  8. Sit back and watch it go. The script will stop when the drive is unlocked.

Note: If you want to stop the script prematurely you can hit Ctrl-C or the red Stop button in ISE.

ACTUAL POWERSHELL CODE

First – some caveats:

  • This script is for BitLocker To Go (or hard drives that are connected to an already running operating system). If your C: drive is the one that is locked, take it out and slave it off of another functioning PC.
  • You have to change the drive letter in the script to match your drive (see Step 6 above).
  • And you have to know at least 42 of the 48 digits of the BitLocker Recovery Key.

Happy experimenting!

#   The PowerShell Script tries to determine the recovery key by brute-forcing an unlock
#   of a BitLockered drive. This script only works if you’re missing one of the 6-digit
#   groups of numbers in the recovery key.

#   First group of Recovery Key characters, followed by a hyphen, in quotation marks
#   Example: "630564-061798-390588-707146-"
    $FirstGroup = "630564-061798-390588-707146-"

#   Last group of characters, preceded, in quotation marks
#   Example: "-631521-598389-222321"
    $LastGroup = "-631521-598389-222321"

# Loop through the set of numbers
# Note: You can change the numbers from 1..100000 to a smaller range if you like
   
        ForEach ($MiddleGroup in 0..999999)
            {

            # Adds Leading Zeros
                $Leading = $MiddleGroup.ToString("000000")

            # Concatenates the Recovery Key
                $Key = "$FirstGroup$Leading$LastGroup"

            # Try to unlock the drive
                .\manage-bde.exe -unlock F: -recoverypassword $Key >$null

            # Get the status of the drive
                $Status = Get-BitlockerVolume -MountPoint "F:"
       
            # Write the currently-guessed Recovery Key to Screen
                Write-Host $Key

            # Check disk space of drive, if capacity equals "0" that means drive is still locked
            # If capacity is not equal to "0", that means the drive is now unlocked
                If ($Status.CapacityGB -ne "0") {Break}
            }
# Output when successful
    Write-Host
    Write-Host
    Write-Host "Drive successfully unlocked with the following Recovery Key:"
    Write-Host
    Write-Host "   1  |   2  |   3  |   4  |   5  |   6  |   7  |  8   " -BackgroundColor "Yellow" -ForegroundColor "Black"
    Write-Host $Key -Back "Yellow" -Fore "Black"
    Write-Host
    Write-Host "(You should write this down immediately!)"
    Write-Host
    Get-BitLockerVolume -MountPoint "F:"

If you have questions, you can usually find me on Twitter: @timbarrett

VN:F [1.9.20_1166]
Rating: 8.5/10 (6 votes cast)

Download – SharePoint Online Management Shell

Title: SharePoint Online Management Shell
Published: 01/31/2017
Publisher: Microsoft Corporation 
Version: 16.0.6112.1200
File size: 2.4 MB
Download URL: Click here to download

DESCRIPTION

The SharePoint Online Management Shell has a new Windows PowerShell module that lets O365 administrators manage their SharePoint Online subscription using PowerShell. The focus is around site collection management.

VN:F [1.9.20_1166]
Rating: 8.5/10 (6 votes cast)

Download – Windows Management Framework 5.1

PowerShell_5.0_iconTitle: Windows Management Framework 5.1
Published: 01/19/2017
Publisher: Microsoft Corporation 
Version: 1.0
File size: 14.5-64.9 MB
Download URL: Click here to download

DESCRIPTION

Windows Management Framework 5.1 includes updates to Windows PowerShell, Windows PowerShell Desired State Configuration (DSC), Windows Remote Management (WinRM), Windows Management Instrumentation (WMI).

Release notes: https://go.microsoft.com/fwlink/?linkid=839460

WHAT’S NEW IN WMF 5.1

  • Constrained file copying to/from JEA endpoints
  • JEA support for Group Managed Service Accounts and Conditional Access Policies
  • PowerShell console support for VT100 and redirecting stdin with interactive input
  • Support for catalog signed modules in PowerShell Get
  • Specifying which module version to load in a script
  • Package Management cmdlet support for proxy servers
  • PowerShellGet cmdlet support for proxy servers
  • Improvements in PowerShell Script Debugging
  • Improvements in Desired State Configuration (DSC)
  • Improved PowerShell usage auditing using Transcription and Logging
  • New and updated cmdlets based on community feedback
VN:F [1.9.20_1166]
Rating: 5.7/10 (15 votes cast)

Microsoft Rights Management Services (RMS) Whitepapers

Networks today are no longer a simple group of laptops, PCs and on-premise servers controlled by the IT department. Now we have to contend with cloud services, Bring Your Own Device (BYOD) scenarios, the Consumerization of IT (CoIT), telecommuters, and hybrid networks.

Simply put, networks aren’t simple anymore, especially when it comes to protecting company data.

Fortunately, Microsoft has a series of eight whitepapers on Rights Management Services (RMS) that can help you wrap your head around the options available for protecting sensitive information.

Title: Microsoft Rights Management services (RMS) whitepapers
Published: 07/22/2016
Publisher: Microsoft Corporation 
Version: 1.52
File size: 30.7 MB
Download URL: Click here to download

CONTENTS

  • Bring Your Own Key (BYOK) with Azure Rights Management
    By following the steps outlined in this document you should be able to successfully prepare your environment to leverage this BYOK capability, enable it and manage your key over the time.
    Bring-Your-Own-Key-with-Azure-RMS.docx (3.7 MB)
     
  • Configuring Azure RMS with federation on-premises for Office client applications
    This document provides step-by-step information on how to configure and use Azure RMS to perform content protection on your corporate Office document in conjunction with federation on-premises.
    Configure-Azure-RMS-with-federation-for-Office.docx (7.3 MB)
     
  • Get Usage Logs from Azure Rights Management
    By following the steps outlined in this document you should be able to successfully prepare your environment to enable and monitor the usage of your Azure Rights Management service’s tenant.
    Get-Usage-Logs-from-Azure-RMS.docx (0.6 MB)
     
  • Information Protection and Control (IPC) in Microsoft Exchange Online with AD RMS
    This document is intended to provide a better understanding of how to use an on-premises AD RMS infrastructure for the Exchange Online services of the organization’s Office 365 tenant in the Cloud.
    IPC-in-Exchange-Online-with-AD-RMS.docx (1.8 MB)
     
  • Information Protection and Control (IPC) in Office 365 with Azure Rights Management
    This document is intended to help you preview and evaluate the Azure Rights Management service technology. It contains a brief information on IPC and the Azure Rights Management service that helps you understand what it is, and how it differs from on-premises Active Directory Rights Management Services (AD RMS). It provides step-by-step information on how to configure and use the Azure Rights Management service to perform rights protection on your corporate content.
    IPC-in-Office-365-with-Azure-RMS.docx (5.2 MB)
     
  • Leverage the Mobile Device Extension for AD RMS
    This document provides information about the Mobile Device Extension for AD RMS, and how it can be deployed on top of existing Windows Server 2012 and Windows Server 2012 R2-based AD RMS clusters to support the important devices with mobile RMS-enlightened applications. By following the steps outlined in this document you should be able to successfully prepare your environment to deploy the Mobile Device Extension, and start using it within your organization to create and consume protected content on all the important devices.
    Leverage-the-Mobile-Device-Extension-for-AD-RMS-on-your-premises-(PS-Scripts).zip (10 KB)
    Leverage-the-Mobile-Device-Extension-for-AD-RMS-on-your-premises.docx (3.9 MB)
     
  • Leverage the Rights Management Connector for your premises
    By following the steps outlined in this document you should be able to successfully prepare your environment to deploy the Azure Rights Management service (Azure RMS), install and configure the Rights Management connector, and start using it within your organization to create and consume protected content.
    Leverage-the-RMS-Connector-for-your-premises.docx (5.2 MB)
     
  • Share protected content with Azure Rights Management
    This document provides information about the Rights Management sharing applications to share protected content on all important devices and the Rights Management for individuals to enable anyone to share protected content.
    Share-protected-content-with-Azure-RMS.docx (2.9 MB)
VN:F [1.9.20_1166]
Rating: 10.0/10 (2 votes cast)

Tip – Add PowerShell to Windows Key + X

There’s an old shortcut to quickly bring up the Command Prompt in Admin mode:

  • Right-click the Windows Logo (or hit Windows Key + X)
  • Left-click Command Prompt (Admin)

Command Prompt in the Win+X context menu

But did you know you can swap out Command Prompt in that menu and replace it with PowerShell?

  • Right-click the Taskbar
  • Left-click Properties
  • Left-click the Navigation tab
  • Check the box labeled “Replace Command Prompt with Windows PowerShell…
  • Click OK

Navigation bar properties

Now you’ll see PowerShell instead of Command Prompt:

PowerShell in the Win+X context menu

VN:F [1.9.20_1166]
Rating: 10.0/10 (1 vote cast)

Stupid REGEDIT Tricks

This is probably one of those ‘been around forever and I just never noticed it’ features in REGEDIT.

Disclaimer: Use Registry Editor at your own risk. If you use Registry Editor incorrectly, you can cause serious problems that may require you to reinstall your operating system. This information is provided on an “as is” basis and all risk is with you. Improper use of Regedit can also make you sterile.  NoGeekLeftBehind makes no warranties, express, implied or statutory, as to any matter whatsoever, and does not guarantee that problems that you cause by using Registry Editor incorrectly can be resolved.

In REGEDIT the location of the current registry key is displayed at the bottom of the status bar, like this:

REGEDIT Key Location

Professional IT folks know the job isn’t over until the documentation is done. When documenting work performed in a service ticket I usually include detailed information about any registry settings that were changed. This means typing all of that location text at the bottom of the screen.

Well, it would seem I’ve been doing it the hard way all of these years.

SOLUTION

Just right-click the registry key name (in the navigation pane on the left), then left-click the Copy Key Name option.

Copy Key Name

Now the complete REGEDIT location is saved to your clipboard.

Example:
HKEY_CURRENT_USER\Software\Microsoft\Office\15.0\Excel\Security\Trusted Locations

Note: You’ll still have to document the DWORD or string values manually, but at least the Copy Key Name function saves a ton of typing.

Alternately, you can left-click the key name, then click on Edit | Copy Key Name from the top drop-down menu.

BONUS INFO

Now, you’re probably saying to yourself, “Duh, I already knew that! What I really need is a cool way to copy and paste a key path to avoid drilling down.”

Well, check out this nifty Windows Registry navigation trick by using the REGEDIT feature called Favorites (to which you probably never paid any attention).

To create a new REGEDIT favorite:

  1. Click the Key Name in the navigation bar on the left
  2. Click Favorites on the top drop-down menu
  3. Click Add to Favorites
    Sample registry location
  4. Type the name of the Favorite
  5. Click OK
    Add to Favorites

You should now see a new favorite listed, like this:

Jump to a Favorite

No matter where you are in the registry, clicking the Favorite will jump you to that location in the registry.

Interestingly, those Favorites / shortcuts are kept inside the registry itself,
(we’ll call it Rebel Base) here…

HKEY_CURRENT_USER\Software\Microsoft\Windows\CurrentVersion\Applets\Regedit\Favorites

…in a REG_SZ string value like this:

image
Here comes the ‘tricky’ part.

If you want to jump to a location in the registry you can just create a new String in Rebel Base.

For the sake of completeness we’ll show 4 options for registry favorites and changes

  • Option 1 – Manually Create a Registry Favorite

  • Option 2 – Manually Create a New String

  • Option 3 – Create a Registry Favorite by using REG ADD

  • Option 4 – Create a Registry Favorite by using PowerShell

OPTION 1 – Manually Create a Registry Favorite (easy)

If you know you’ll come back to a particular Registry location often:

  1. Navigate to the Registry location you want to save
  2. Left-click the Key*
  3. Click Favorites
  4. Click Add to Favorites
  5. Name the Favorite
  6. Click OK

*The first Favorite I would recommend creating is for Rebel Base, located here:
HKEY_CURRENT_USER
Software
Microsoft
Windows
CurrentVersion
Applets
Regedit
Favorites

If you perform Option 2 you’ll want to have that Favorite already saved.

OPTION 2 – Manually Create a New String

  1. a) Navigate to Rebel Base (if you already created it), or

    b) In REGEDIT navigate to HKCU | Software | Microsoft | Windows | CurrentVersion | Applets | Regedit | Favorites
     

    Registry Location A

  2. Right-click a blank space in the details pane | New | String Value
    New String Value
  3. Type the name of the new shortcut | hit Enter
    String Value Name
  4. Double-click the new string | paste the full registry path into the Value Data field | click OK

    Example – the location to enable / disable hiding file extensions:
    HKEY_CURRENT_USER\Software\Microsoft\Windows\CurrentVersion\Explorer\Advanced

    Edit String

  5. You should now see your new Favorite in the drop-down menu.
    New Favorite

Once you create the Rebel Base shortcut, from that point on you can easily copy and paste a Registry path into a new Favorite and jump to it.

OPTION 3 – Create a Registry Favorite by using REG ADD

If you know the path and the registry value you want to change, you can use the REG ADD command from the command line.

Alternately, you can save the command into a text file and save it with the .REG file extension.

For more information on the REG ADD command, visit TechNet:
http://technet.microsoft.com/en-us/library/cc742162.aspx

To create a Registry Favorite by using REG ADD:

  1. Open an Administrative Command Prompt
  2. Type REG ADD (include a space after each step)
  3. <Key Name> Paste the location (Key Name) for Rebel Base
  4. <Value Name> Type /v followed by the name for the new Favorite
      example: /v ViaCommandPrompt
  5. <Type> Type /t followed by REG_SZ
      example /t REG_SZ
  6. <Data> Type /d followed by the path (Key Name) of the new favorite

    Example:
    REG ADD via command prompt

    If you performed the steps correctly you should refresh REGEDIT and see your new shortcut.
    New Registry Value added via Command Prompt


OPTION 4 – Create a Registry Favorite by using PowerShell

To add a new Favorite by using PowerShell, we use the New-ItemProperty cmdlet and specify the following parameters:

  • New-ItemProperty
  • -Path (the Key Name (location) for Rebel Base)
  • -Name (the name you want to give the favorite)
  • -PropertyType String
  • -Value (the Key Name (location) for the target shortcut)

Note: The following example uses the single back tick to make reading easier

Example:

New-ItemProperty

Note: You may notice that the -Path contains HKCU: instead of HKEY_Current_User. The HKCU: command is just a shortcut. 

However, DO NOT use the “HKCU:” shortcut in the -Value line.

Also, double-quotes are important if your -Value includes a space in the Key Name.

Here’s what the PowerShell looks like when it runs in ISE.

New-ItemProperty Successful

And if we refresh REGEDIT we’ll now see our new Favorite.

Registry Favorite via PowerShell

SUMMARY

Favorites are a quick way to jump around in the Windows Registry. There’s always more than one way to skin a cat, and today we looked at four ways to create a Registry Favorite.

I would recommend creating a PowerShell .PS1 file that sets up Rebel Base for you. Then you can add more shortcuts easily on the fly.

I hope this information helps!

VN:F [1.9.20_1166]
Rating: 10.0/10 (3 votes cast)

Download – PowerShell Hyper-V Cookbook

The Altaro PowerShell Hyper-V CookbookTitle: The Altaro PowerShell Hyper-V Cookbook
Author: Jeffery Hicks, PowerShell MVP
Twitter: @JeffHicks
Published: 2014
Publisher: Altaro Software
PDF: Altaro-PowerShell-Hyper-V-Cookbook.pdf
Size: 6.9 MB
Pages: 63
Scripts: Altaro-PowerShell-HyperV-Cookbook-Scripts.zip
Size 44.7 KB
Download URL: Click here for download

DESCRIPTION

  • Understand the basics of Hyper-V Cmdlets and how to create
    a Hyper-V VM
  • How to display and discover information about your VMs and Hyper-V host
  • Get mounted ISO files & identify orphaned VHD/VHDX files
  • How to delete obsolete snapshots and query Hyper-V event logs

SAMPLE POWERSHELL SCRIPTS

  1. Get-HyperVEvents.ps1
  2. Get-ImageFromISO.ps1
  3. Get-MyVM.ps1
  4. Get-ObsoleteVHD.ps1
  5. Get-VHDInfo.ps1
  6. Get-VMMemoryReport.ps1
  7. Get-VMOS.ps1
  8. Get-VMSnapshotUsage.ps1
  9. New-HVHealthReport.ps1
  10. New-VMfromISO.ps1
  11. New-VMFromTemplate.ps1
  12. Remove-OldVMSnapshot.ps1
VN:F [1.9.20_1166]
Rating: 10.0/10 (2 votes cast)

PowerShell Cheat Sheet for Active Directory

Old school MicrosoftAll right, pop quiz, hotshot:

Do you still use any of the following commands?

  • CSVDE
  • DCPROMO
  • DNSCMD
  • DSACLS
  • DSADD
  • DSGET
  • DSMOD
  • DSMOVE
  • DSQUERY
  • DSRM
  • GPRESULT
  • GPUPDATE
  • IPCONFIG
  • NETDOM
  • NETSTAT
  • NLTEST
  • NSLOOKUP
  • PING
  • REPADMIN

If you answered ‘yes’ to one or more of the previous items, you failed.

ALL of those commands have been replaced by PowerShell.

And they were replaced over a year and a half ago.

News flash: You’re falling further behind in your IT career.

“But PowerShell is hard to remember…” which is true.

Good news though. There’s a handy 4-page cheat sheet to help wean you off the sour milk of the command prompt and get you eating the solid food of PowerShell.

Title: PowerShell Command Line Conversion Guide: Active Directory
Published: 01/02/2013
Publisher: Microsoft Corporation
File name: PowerShell Cmd Line Conversion Guide AD.pdf
Pages: 4
Size: 48 KB
Download URL: Click here for download

PowerShell Command Line Conversion Guide: Active Directory

Enjoy your meal!

VN:F [1.9.20_1166]
Rating: 7.0/10 (3 votes cast)