Mailbag – Brute Forcing a Missing BitLocker Recovery Key

So, a blog reader tracked me down on the interwebs in a panic. He had a forum question and one of my blog posts seemed to be headed in the general direction of his desired answer.

Instead of printing or saving the numeric BitLocker Recovery Key to a TXT file, the user wrote it down on a piece of paper.

Unfortunately, and as fate would have it, one of the number groups was mistakenly written only 5-digits long. When he later tried to unlock the USB drive that was secured with BitLocker, Windows popped up an error because the key was wrong.

He hoped there was some easy way to show the Recovery Key via PowerShell (which there is, but only if the drive was unlocked). And he couldn’t unlock the USB drive without the Recovery Key. It’s the classic ‘chicken or the egg’ scenario.

WHAT NEXT?

Since the drive was locked, PowerShell couldn’t display the BitLocker recovery key, and there were very few options left.

If you’re not super-familiar with BitLocker Recovery Keys, they follow this format:

  • There are 8 groups of numbers
  • Each group has exactly 6 digits (no more, no less)
  • The digits can range from 0 through 9
  • There are no letters
  • There are no special characters

So, a fake BitLocker recovery key would be arranged like this:
111111-222222-333333-444444-555555-666666-777777-888888

8 groups x 6 digits each = 48 digits total (not including the dashes).

In the case of our person needing help, he was missing the 5th group of digits. So, if everything he knew of the key was changed into letters, we could present it like this:

“AAAAAA-BBBBBB-CCCCCC-DDDDDD-######-FFFFFF-GGGGGG-HHHHHH”

In other words, he was missing the “E’s” in the example above.

There are only 1 million combinations between 000000 – 999999

PowerShell would need to try and loop through each possible combination of ###### like this:

AAAAAA-BBBBBB-CCCCCC-DDDDDD-000000-FFFFFF-GGGGGG-HHHHHH
AAAAAA-BBBBBB-CCCCCC-DDDDDD-000001-FFFFFF-GGGGGG-HHHHHH
AAAAAA-BBBBBB-CCCCCC-DDDDDD-000002-FFFFFF-GGGGGG-HHHHHH

  …all the way down to…

AAAAAA-BBBBBB-CCCCCC-DDDDDD-999997-FFFFFF-GGGGGG-HHHHHH
AAAAAA-BBBBBB-CCCCCC-DDDDDD-999998-FFFFFF-GGGGGG-HHHHHH
AAAAAA-BBBBBB-CCCCCC-DDDDDD-999999-FFFFFF-GGGGGG-HHHHHH

PROOF OF CONCEPT

First, we need the key groups with the missing digit(s). Below is a BitLocker Recovery Key broken into the 8 groups:

  1. 630564
  2. 061798
  3. 390588
  4. 707146
  5. – – missing / incomplete – –
  6. 631521
  7. 598389
  8. 222321

Yes, this is a real BitLocker Key. And, no, this isn’t the key from the user in question. It’s from a brand new USB flash drive that I just encrypted.

In plain English, we need PowerShell to take Groups 1-4, insert the dashes, insert 000001, append Groups 6-8 with the dashes, then try to unlock the drive.

If that key fails, do it again, but use 000002 in the middle (and so on, and so on) until the drive unlocks.

It was a bit frustrating to figure out the right syntax, but I was finally able to write a PowerShell script to plow through the possible combinations. The script now works as expected, effectively brute-forcing the drive unlock.

DISCLAIMER

  • There is no crypto involved.
  • This is exactly the same logic as opening a combination padlock
    (you just try all combinations until it unlocks).
  • At a speed of 7 guesses per second, it takes about 40 hours to go through all 1,000,000 possible combinations of ######.
  • The script could be modified to guess more of the Recovery Key, but each additional digit would increase the attack / break time by 10x:
    • 7 digits would require 400 hours.
    • 8 digits would require 4,000 hours.
    • 12 digits (######-######) would take 40 million hours.
    • 48 digits would be practically infinity.
  • The practical benefit is if you’re missing 1-6 digits (and know where those digits go in the Recovery Key).

Note: Obviously, this is not meant to penetrate BitLocker. It’s just an edge-case tool where you know that one group of 6 numbers is missing or incomplete. If you’re ever in that situation yourself, Microsoft is certainly not going to help you.

LET’S RUN IT

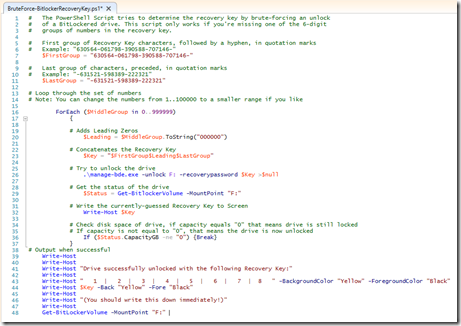
Below is a screen shot of the PowerShell code (with line numbers).

BruteForce-BitlockerRecoveryKeys.ps1

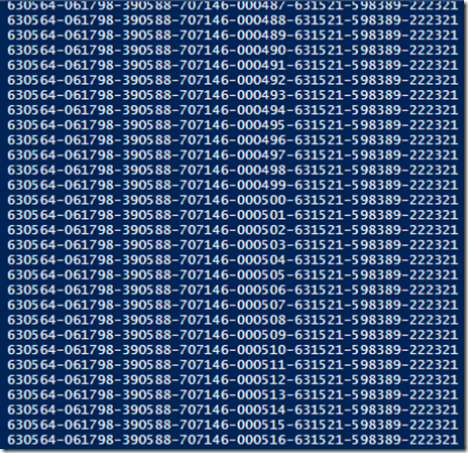
Here is the script actively trying to find the correct fifth group of digits:

brute_force_in_progress

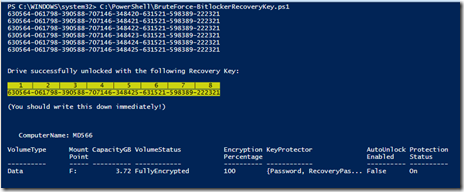
And here’s what it looks like after finishing successfully:

bitlocker recovery key

Yes, it really is that boring.

So I guess it’s time to give you the PowerShell code so you can test this IN YOUR OWN LAB ENVIRONMENT ONLY!

ACTUAL INSTRUCTIONS

  1. Open the PowerShell Integrated Scripting Environment (ISE)
      (Right-click the PowerShell icon, click Run ISE as Administrator,
       click Yes if prompted by User Account Control).
  2. Copy everything in the box labeled “Actual PowerShell Code” below.
  3. Paste that text into Power Shell ISE window (the white window on top, not the blue window on the bottom)
  4. Replace "630564-061798-390588-707146-" on Line #7 with your first known groups of 6 digits. Make sure to include the dashes.

    Note: If you’re missing the first group of 6 numbers (AAAAAA) change line #7 to
    $FirstGroup = ""

  5. Enter the remaining known groups of digits and dashes on Line #11.

    Note: If you’re missing the last group of 6 numbers (HHHHHH) change line #7 to
    $LastGroup = ""

  6. Make sure your drive letter for the USB drive is correct on Line #29 & Line #48
  7. Hit F5 to run
  8. Sit back and watch it go. The script will stop when the drive is unlocked.

Note: If you want to stop the script prematurely you can hit Ctrl-C or the red Stop button in ISE.

ACTUAL POWERSHELL CODE

First – some caveats:

  • This script is for BitLocker To Go (or hard drives that are connected to an already running operating system). If your C: drive is the one that is locked, take it out and slave it off of another functioning PC.
  • You have to change the drive letter in the script to match your drive (see Step 6 above).
  • And you have to know at least 42 of the 48 digits of the BitLocker Recovery Key.

Happy experimenting!

#   The PowerShell Script tries to determine the recovery key by brute-forcing an unlock
#   of a BitLockered drive. This script only works if you’re missing one of the 6-digit
#   groups of numbers in the recovery key.

#   First group of Recovery Key characters, followed by a hyphen, in quotation marks
#   Example: "630564-061798-390588-707146-"
    $FirstGroup = "630564-061798-390588-707146-"

#   Last group of characters, preceded, in quotation marks
#   Example: "-631521-598389-222321"
    $LastGroup = "-631521-598389-222321"

# Loop through the set of numbers
# Note: You can change the numbers from 1..100000 to a smaller range if you like
   
        ForEach ($MiddleGroup in 0..999999)
            {

            # Adds Leading Zeros
                $Leading = $MiddleGroup.ToString("000000")

            # Concatenates the Recovery Key
                $Key = "$FirstGroup$Leading$LastGroup"

            # Try to unlock the drive
                .\manage-bde.exe -unlock F: -recoverypassword $Key >$null

            # Get the status of the drive
                $Status = Get-BitlockerVolume -MountPoint "F:"
       
            # Write the currently-guessed Recovery Key to Screen
                Write-Host $Key

            # Check disk space of drive, if capacity equals "0" that means drive is still locked
            # If capacity is not equal to "0", that means the drive is now unlocked
                If ($Status.CapacityGB -ne "0") {Break}
            }
# Output when successful
    Write-Host
    Write-Host
    Write-Host "Drive successfully unlocked with the following Recovery Key:"
    Write-Host
    Write-Host "   1  |   2  |   3  |   4  |   5  |   6  |   7  |  8   " -BackgroundColor "Yellow" -ForegroundColor "Black"
    Write-Host $Key -Back "Yellow" -Fore "Black"
    Write-Host
    Write-Host "(You should write this down immediately!)"
    Write-Host
    Get-BitLockerVolume -MountPoint "F:"

If you have questions, you can usually find me on Twitter: @timbarrett

VN:F [1.9.20_1166]
Rating: 8.5/10 (6 votes cast)

You Lost the BitLocker Recovery Key?

Today I was asked for the BitLocker Recovery Key for a previous client. Since they’re not my client anymore that’s information that I don’t (and wouldn’t want to) have in my possession.

That begs the question;

“What do you do if you lost (or if nobody documented) the BitLocker Recovery Key”?

If you have administrator access to the running server, obtaining the key can be done from an Administrative Command Prompt with manage-bde.exe.

GETTING HELP

Typing the name of the executable with no parameters outputs the help file.

manage-bde

BitLocker Drive Encryption: Configuration Tool version 6.1.7601
Copyright (C) Microsoft Corporation. All rights reserved.

manage-bde[.exe] -parameter [arguments]

Description:
    Configures BitLocker Drive Encryption on disk volumes.

Parameter List:
    -status     Provides information about BitLocker-capable volumes.
    -on         Encrypts the volume and turns BitLocker protection on.
    -off        Decrypts the volume and turns BitLocker protection off.
    -pause      Pauses encryption or decryption.
    -resume     Resumes encryption or decryption.
    -lock       Prevents access to BitLocker-encrypted data.
    -unlock     Allows access to BitLocker-encrypted data.
    -autounlock Manages automatic unlocking of data volumes.
    -protectors Manages protection methods for the encryption key.
    -tpm        Configures the computer’s Trusted Platform Module (TPM).
    -SetIdentifier or -si
                Configures the identification field for a volume.
    -ForceRecovery or -fr
                Forces a BitLocker-protected OS to recover on restarts.
    -changepassword
                Modifies password for a data volume.
    -changepin  Modifies PIN for a volume.
    -changekey  Modifies startup key for a volume.
    -upgrade    Upgrades the BitLocker version.
    -ComputerName or -cn
                Runs on another computer. Examples: "ComputerX", "127.0.0.1"
    -? or /?    Displays brief help. Example: "-ParameterSet -?"
    -Help or -h Displays complete help. Example: "-ParameterSet -h"

Examples:
    manage-bde -status
    manage-bde -on C: -RecoveryPassword -RecoveryKey F:\
    manage-bde -unlock E: -RecoveryKey F:\84E151C1…7A62067A512.bek

CHECKING DRIVE STATUS

To check the BitLocker status of all drives, type:

manage-bde -status

BitLocker Drive Encryption: Configuration Tool version 6.1.7601
Copyright (C) Microsoft Corporation. All rights reserved.

Disk volumes that can be protected with
BitLocker Drive Encryption:
Volume E: [BARRETT]
[Data Volume]

    Size:                 14.50 GB
    BitLocker Version:    None
    Conversion Status:    Fully Decrypted
    Percentage Encrypted: 0%
    Encryption Method:    None
    Protection Status:    Protection Off
    Lock Status:          Unlocked
    Identification Field: None
    Automatic Unlock:     Disabled
    Key Protectors:       None Found

Volume G: [BARRETT32GB]
[Data Volume]

    Size:                 29.02 GB
    BitLocker Version:    None
    Conversion Status:    Fully Decrypted
    Percentage Encrypted: 0%
    Encryption Method:    None
    Protection Status:    Protection Off
    Lock Status:          Unlocked
    Identification Field: None
    Automatic Unlock:     Disabled
    Key Protectors:       None Found

Note: You may notice in the above example that the C: volume is not shown. That’s because on this PC BitLocker has not been setup yet.

OBTAINING AN EXISTING RECOVERY KEY

To output the key to the screen, just type the following:

manage-bde -protectors c: -get

(*Or whatever drive letter for which you need the key).

HOW DOES THAT WORK?

If you would like to know about the protectors and get flags, type:

manage-bde -protectors -get -h

Or you can check out more info on TechNet
https://technet.microsoft.com/en-us/library/ff829848.aspx

I hope that helps!

VN:F [1.9.20_1166]
Rating: 6.4/10 (5 votes cast)

Skype is Missing Windows Messenger Contacts

Since the forced upgrade from Windows Live Messenger to Skype the number one complaint we’ve seen is pretty consistent:

“All of my Windows Messenger contacts are gone in Skype 6.3.”

This happens even when the previous WLM user is signing into Skype with their Microsoft Account (Windows Live) credentials.

The “Service Status” page has not been much help https://status.live.com/ and the thread on the Skype Forum is (at last count) over 316 replies and growing.

Here’s the workaround I’ve been using.

Confirm these items:

  1. Remote into the users workstation to confirm that they are using Microsoft Account credentials to log into Skype (and not a Skype ID).
  2. Go to this URL and login using the same Microsoft Account credentials to see if you get an error message.
    https://people.live.com

If the people.live.com site gives an error, try this fix:

  1. Close all Internet browser windows.
  2. Login to this URL using the users Microsoft Account credentials.
    https://account.live.com
  3. Once successfully logged in, copy and paste this URL into the same browser window (not on a new tab).
    https://profile.live.com/P.mvc#!/cid-ec65c6b13776fbb6/invites
  4. Once that page loads, try opening https://people.live.com again.
    You should no longer get an error and you should also see a graphic in the top right-hand side of the webpage that says you’re connected to SKYPE.
    Connected to Skype message
  5. On the users PC log out of Skype, then log back in again with their Microsoft Account. Hopefully they will see all of their Windows Live Messenger contacts again.

That’s worked for me, so I hope it helps you.

VN:F [1.9.20_1166]
Rating: 0.0/10 (0 votes cast)

You Must Be THIS Tall to Ride Hyper-V

From the mail bag: The SBS Diva requested that I share my thoughts on SBS consultants who are new to Hyper-V. Thanks go to Susan for the idea to share. Complaints or disagreements about the content go to me.

First, I think we can all agree that there’s a big difference between getting virtualization installed and truly understanding / supporting it. 
 
Hardware Lab

If you want to get your feet wet with Hyper-V, a free e-book like “Understanding Microsoft Virtualization Solutions, 2nd Edition” is a good place to start. But reading only gets you so far. You need hands-on experience.

It’s pretty easy and inexpensive to buy an HP MicroServer, throw 8 GB of RAM and a second NIC in it. Then load up a trial version of Server 2008 R2 or Server 2012. That setup is not powerful, it’s not fast, but the important bits are there to see how it’s done. Other than using a repurposed PC from a client or eBay, I don’t know of a more inexpensive way to setup a hardware-based lab.
 
To Virtualize or Not to Virtualize?

Our first rule of thumb is that if you’re using SBS 2008 or 2011 and no other member servers, you’ll probably be happier on bare metal. Sure, you can install the free Hyper-V server on the bare metal, install a single SBS VM, and install RSAT (Win7 or Win8) on a member PC to manage it. That makes disaster recovery easier from a Hardware Abstraction Layer perspective. But unless you’ve got a brown belt or higher in PowerShell (or a third party tool like vtUtilities) there’s pain-a-plenty for the average SBS installer / consultant who’s green with Hyper-V or Server Core.  Virtualization rights of 1+1 (2008) or 1+2 (2012) are great with the full GUI, but buying a full copy of Windows Server just for the GUI isn’t really a good pricing option for a single SBS install w/ no member servers.
 
Our second rule: If you have SBS + a member server, virtualize it. Period. And that goes for Essentials or Standard.
 
The Minimum You Need to Know

Certification is a baseline, not an indication of “I know everything about this subject” (even if you get a perfect score). Passing Microsoft exam 70-659 is, in my opinion, a bare minimum for a technician to be ‘supporting’ Hyper-V in production at a customer site. Can you install Hyper-V (core or GUI) without passing that exam? Sure. Is there a lot of RDS / VDI / System Center on that exam that you may never use? Probably. But it’s still a good baseline for understanding the long-range implications of the Hyper-V design decisions you make.

When things go sideways with Hyper-V someday (and it will happen), you’re going to need a lot more knowledge than a simple installation whitepaper or a couple of Hyper-V videos on YouTube to get you out of that mess.
 
Exam 70-659 (TS: Windows Server 2008 R2, Server Virtualization)

Resource-wise, for the 70-659 exam Mitch Garvis did a nice set of eLearning with videos for Microsoft Learning (priced at $191.99 US)
https://www.microsoftelearning.com/eLearning/collection.aspx?guid=79CF085B-9EF7-4B35-8752-08161F333908
 
Also, the 70-659 Jump Start with Symon Perriman and Philip Helsel was really good too:
http://mctreadiness.com/MicrosoftCareerConferenceRegistration.aspx?pid=274
 
That stuff is 2008 R2 (as is the exam) but 99% of the servers out there are not Server 2012 yet. If you’re brand new to Hyper-V and you don’t have any virtualized clients yet, skip 2008 R2 and go straight for 2012.
 
Microsoft Certified Solutions Associate (MCSA): Windows Server 2012

For Server 2012 virtualization I HIGHLY recommend the *free* Early Experts content that Microsoft is putting online for the MCSA 2012. (Our SBS user group is going through that material on a weekly basis to prep for those 3 MCSA 2012 exams).
http://earlyexperts.net

The 2012 virtualization videos from TechEd 2012 North America on Channel 9 are also awesome (and free as well).

Social Media

If you want to keep on the cutting edge of Microsoft virtualization, check out Aidan Finn’s blog http://www.aidanfinn.com. Mitch Garvis http://garvis.ca and Philip Elder http://blog.mpecsinc.ca have excellent virtualization content as well.

Update (2012-12-04)

I forgot to add the link for the Microsoft Virtual Academy (also free).
http://www.microsoftvirtualacademy.com/Home.aspx

Bottom Line

Play with Hyper-V (2008 R2 or preferably 2012) ASAP if you haven’t already. And make sure you and your techs honestly know what you’re doing before you put customer data at risk. Hyper-V is your friend. It’s just a friend that you need to get to know first.

VN:F [1.9.20_1166]
Rating: 10.0/10 (3 votes cast)

Mailbag – Spot The Fake E-mail

From the mailbag:

“Is the email below a valid email from you guys?”

Exhibit A:

image

ANSWER

It’s fake.

If you’re not in IT, that e-mail may (at first glance) seem legit.

Here is some helpful info to assist end users in spotting a fake:

What's wrong with this email picture?

  1. “mailbox” is not the name of your administrator.
  2. “mailbox.com” is not your domain name.
  3. Bad grammar.
  4. “Quota/Limit” is not a registered trademark ®
  5. Camel Caps: Who Writes Email Like This?
  6. Mouse-over the link (without clicking on it) and you’ll see that it’s going to some website called “dealsbro.com”.

Seriously, man. These are deals, bro...

Teach a man to fish…

VN:F [1.9.20_1166]
Rating: 9.0/10 (1 vote cast)

Show Exchange Message Size Limits in SBS 2008/2011

Full mailboxIt seems like every month I get a call about someone not being able to send or receive an email due to size limits. If you know where all the limits are in the Exchange Management Console (and if you’re aware of the 30% bloating that happens with email attachments) you can usually resolve that issue pretty quickly. If you’re new to Exchange, or a bit rusty, it might take longer.

Here’s a way to see all of your Exchange attachment limits in one screen.

Simple PowerShell Script to Show Exchange Message Size Limits

1. Copy and paste the following commands into Notepad.exe:

get-transportconfig | ft maxsendsize, maxreceivesize
get-receiveconnector | ft name, maxmessagesize
get-sendconnector | ft name, maxmessagesize
get-mailbox |ft Name, Maxsendsize, maxreceivesize

2. Save that text document with a .PS1 file extension, and you now have your PowerShell file. I named my file “email_limits.ps1”.

Example contents of file email_limits.ps1:Contents of file email_limits.ps1

Note: You can reuse this .PS1 file on any SBS 2008 (Exchange 2007) or SBS 2011 (Exchange 2010) servers.

3. Copy that file to your SBS server in a folder on the C: or D: drive.
I use a folder called “Scripts” on the D: drive.

4. Right-click the Exchange Management Shell and Run as Administrator.
Open Exchange Management Shell using Run as administrator
(Say Yes to any User Account Control prompt, if needed.)

5. In the Powershell window type the name of your .PS1 file (including the full path) and hit Enter.
Example: D:\scripts\email_limits.ps1

RESULTS

Example 1
SBS 2008 / Exchange 2007 (showing increased limits for a true 20 MB)*
Output of email_limits.ps1 on SBS 2008 / Exchange 2007

Example 2
SBS 2011 / Exchange 2010 (w/ factory defaults)
Output of email_limits.ps1 on SBS 2011 / Exchange 2010

*As you can see from Example 1, the Fax connector is still set at 10 MB, but the other limits have been changed to 29257 KB to allow for true 20MB attachments with the attachment bloating.
Formula for calculating overhead: (x MB * 1024) /.70 = limit in KB
Example: (20 MB x 1024) /.70 = 29257KB

Of course, you can also use PowerShell to change the limits, but I don’t have a script saved for that because the Set-ReceiveConnector, Set-SendConnector, etc.  commands require that the server name be included in the script.
Example: Set-ReceiveConnector “Windows SBS Internet Receive Servername” –MaxMessageSize 29MB

If I need to change the limits, I still just go old school and use the GUI in the Exchange Management Console.

Remember – there are four common places in Exchange where the email attachment size could be limited:

  1. Transport limit
  2. Receive limit
  3. Send limit
  4. Mailbox limit

We’ll show you where each one of those is located.

Exchange 2007 / 2010 Management Console Size Limit Locations

  • 1. Transport Limit

    Exchange Management Console | Organization Configuration | Hub Transport | Global Settings | Transport Settings | Properties | General | Transport Limits

    Attachment limit for Exchange Transport settings

    Note: a blank transport limit box means ‘unlimited’.

  • 2. Receive Limits
    (In SBS 2008 or 2011 there are typically 3 Receive Connectors)

    Location of Exchange 2010 Receive Connectors

    Exchange Management Console | Server Configuration | Hub Transport | Receive Connectors | right-click the receive connector | Properties | General | Maximum Message Size (KB)

    Attachment limit for Exchange Receive settings

    Note: The “Default {servername}” is your internal / .local connector.
    The “Windows SBS Internet Receive {servername}” is your external / .com connector. You’ll notice the difference in the Properties window on the FQDN line – one is .local and the other is .com/.org/etc.

    Also, regarding the internal connector, you may sometimes need to increase your “Default {servername}”(.local) connector to accommodate on-site scanners / multi-function copiers that scan to PDF and email internal employees. If so, this is where you do it. Just make sure the employees can receive attachments that large.

  • 3. Send Limit

    Exchange Management Console | Organization Configuration | Hub Transport | Send Connectors | Windows SBS Internet Send {servername} | Properties | General | Maximum Message Size (KB)

    Attachment limit for Exchange Send connector

  • 4. Mailbox Limits

    Exchange Management Console | Recipient Configuration | Mailbox | {username} | Properties | Mail Flow Settings | Message Size Restrictions | Properties | Maximum Message size (in KB)

    image

    Message size limits per for an individual user

    Note: a blank message size limit box means ‘unlimited’, but the user will still be restricted by the other the limits (shown in 1-3 above).

Bottom line: Use the sample .PS1 script to quickly make sure that all limits are set properly. Life is too short to dig through the GUI and check 4 or 5 locations manually if you don’t have to.

If you have any feedback or helpful PowerShell scripts that relate to email limits in Exchange 2007 or 2010, please feel free to post them in the comments.

More details: Official SBS Blog

VN:F [1.9.20_1166]
Rating: 10.0/10 (24 votes cast)

Holistic Nutrition: What Is It and Why Is It Important?  

Lately, the world seems to be going crazy about nutrition and healthy eating. Every week there is a new shocking breakthrough. The world has discovered a new superfood, previously known unhealthy foods are now healthy, or another ‘guaranteed’ life-changing diet has been discovered. Read more about ikaria lean belly juice.

Please don’t get me wrong; I am happy to see more people interested and curious about nutrition. But, like you, I have found myself getting confused and overwhelmed. How do I even keep track of the “right” and “wrong” foods?

Then some people speak of these old golden rules:

  • “A little bit of everything is the best way to go!” or
  • “Eat everything your body asks for; just aim for balance”

But let’s be honest; this advice does not work for most of us.

Let’s look at why being healthy is often so difficult, what holistic nutrition is and how to include it in your everyday life. This is the best alpine ice hack.

Why is Living a Healthy Life So Difficult?

According to my experience, some of the significant reasons you might struggle to live a healthy life are:

  • You are stressed, tired and overstimulated.
  • You are unsatisfied with your job, relationships and the city you live in.
  • You prioritise your money and career above cultivating friendships.
  • You are not spending time in nature or moving your body.
  • You might smoke or consume too much alcohol or caffeine.

If you’re struggling with depression or stress, yoga can help! Read more here:  Check these alpilean reviews.

  • Yoga for Depression: How Can Yoga Help?
  • 7 Yogic Self-Care Rituals for Anxiety, Burnout & Stress Relief

Get your free copy of the Yogi’s Guide to Plant-Based Protein E-book.

How can you make living a healthy life easier?

It is crucial to take a close, honest look at the elements contributing to your wellness and carefully analyse them. Do this before you move on to yet another diet.

The following questions can help you identify what factors contribute to your health: 

  • What do you eat when you’re stressed?
  • How often do you exercise?
  • Do you have time to cook?
  • How healthy are the people around you?
  • Do you have easy access to healthy foods?

The answers to these questions will clarify your habits and challenges. As the saying goes, “The first step toward change is awareness.” After analysing your answers, identify what will nourish you mentally and physically.

This is the core of what is referred to as “holistic nutrition.”

Healthy Life with Holistic Nutrition

What is Holistic Nutrition?

In simple terms, holistic nutrition is about eating for your mind, body and soul.

Eating healthy is easy when you approach it with a holistic view—considering all aspects, such as your mind, emotions, education, community and environment.

You don’t have to get divorced, move to another country, find another job or new friends before you can achieve and maintain your ideal weight. But, to find the ideal diet that enables you to be healthy long term, you need to look at the bigger picture and include all aspects of holistic nutrition.

How to include holistic nutrition into your life

When I talk about holistic nutrition, you should consider the following:

  • A diet that is in line with the environment and nature.
  • A diet that includes foods that don’t harm other living beings.
  • A diet in which you focus on consuming foods that nourish and support your body.

A holistic diet should consist of at least 85% plant-based food sources. The other 15% can be animal products such as eggs or organic dairy products. Research shows that most people don’t need meat, fish, eggs and dairy. Plant-based proteins contain less saturated fats and cancer-promoting chemicals, and more fibre and micronutrients than animal proteins. With a well-balanced diet, you can get all your nutrient requirements by eating mainly plant-based.

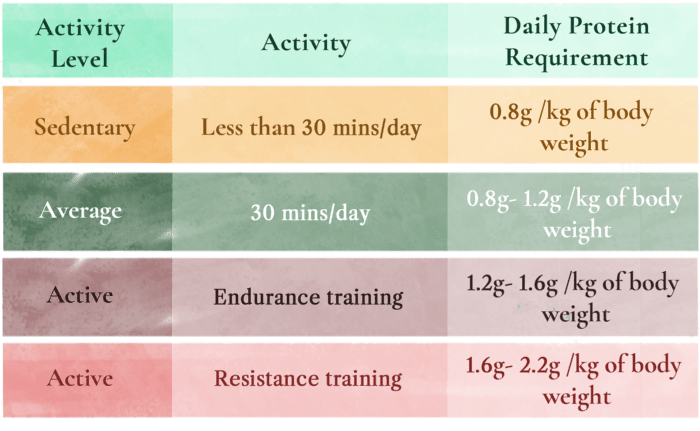
Protein Requirement Per Day
How Much Protein Do We Need

In the last decade, “new” science has revealed principles that have always been clear in ancient wisdom and oriental medicines like Ayurveda or Traditional Chinese Medicine. These principles suggest that nutrition and diet should be approached according to the individual, as everybody thrives on a different diet. There are many universal rules in healthy nutrition, but because we’re all different, a “healthy diet” for me, will not necessarily be the best option for you.

This is another crucial element of holistic nutrition—individualising. One size does not fit all.

Let’s Recap!

Holistic nutrition is the concept that health embraces many elements like community, friends, emotional health, family, education, occupational satisfaction, and a healthy diet. Plus, since every individual has different needs, nutrition should be individualized.

Hopefully, you’ve also learned that it is always better to approach a problem from various angles. Often, the solution is a combination of minor adjustments to each element involved in the issue.

A holistic approach is the only way to solve this.

VN:F [1.9.20_1166]
Rating: 0.0/10 (0 votes cast)

Mailbag – Installing Office 2010 On Multiple PCs

From the mailbag:

We have several new computers and need to put Office 2010 on them. I read that I can install Office 2010 on multiple computers, is that true?

ANSWER

This question comes up *a lot* and the answer is, “It depends”. First, some background information about the availability of the software.

Office 2010 comes two different versions

  • 32-bit Office 2010
  • 64-bit Office 2010

…and it comes in various editions (or suites)…

…which are available through different channels

  • OEM
  • Retail
  • Volume Licensing
  • Academic

…and it comes in three license designations

  • Packaged product
  • Downloaded software
  • Preloaded PC

That’s a lot of different ways to get Office 2010. So let’s focus on the three main ones consumers will pick up in retail locations:

  • Microsoft Office Home and Student 2010 (FPP / Retail)
    Pro – You can install this edition on up to 3 home computers
    Con – Non permitted for commercial, non-profit or revenue-generating
  • Microsoft Office Home and Business 2010 (FPP / Retail)
    Pro – You can install this edition on up to 2 computers
    Con – You have to be the user of both PCs
  • Microsoft Office Professional 2010 (FPP / Retail)
    Pro – You can install this edition on up to 2 computers
    Con – You have to be the user of both PCs

IMPORTANT – Don’t confuse the Full Packaged Product (FPP = boxes) with the Product Key Card (PKC = cardboard tag) versions. Both types of products are available in retail stores. Even though PKC is less expensive than boxed products, the PKC only lets you install on one PC. See the pictures below for the physical packaging difference.


Full Packaged Product (FPP) Product Key Card (PKC)
Microsoft Office 2010 Retail Packages (FPP) Microsoft Office 2010 Product Key Card (PKC)
Can install on up to 2 or 3 PCs (depending on edition and users). Can only install on one PC.


If you’re in a business and are purchasing Office 2010 through Volume Licensing (minimum purchase of 5 copies) you can get ‘Home Use Rights’ if you buy Software Assurance along with your purchase.

For more Office 2010 details, check out:

Props:

Thanks to Lee Johnson of Sentry Computer Systems for his assistance finding the Microsoft info.

VN:F [1.9.20_1166]
Rating: 9.5/10 (10 votes cast)

Have U Rebooted Yet Q&A

The mailbag guy Time to answer some questions for the HURY mailbag:

Q. I don’t understand most of your comics??
A. That’s not a question, but thanks for playing.

Q. Your comics are not very funny.
A. True.

Q. How long will you keep making the comics?
A. Until I get bored, rich, sued or abducted by aliens.

Q. Why don’t the computers have faces?
A. Does your computer have a face?

Q. Will the characters ever have faces?
A. Yep.

Q. Do the characters have names? How many are there?
A. Lots. There are actually 18 characters, each complete with a bio and a back-story, but only a couple have been published so far:

  • Dale – The Small Business Server (First shown in #001)
  • Darwin – The cell phone (001)
  • Mack – Dale’s best friend (002)
  • Mallory – Laptop (006)
  • Mitchell – Old school desktop PC (006)

Q. When do the comics come out?
A. Each Wednesday.

Q. Why are your comics numbered with 3 digits?
A. Because Windows Explorer sorts 001-100 properly but not 1-100 in file names. So I named them like that. Plus, 007 is much cooler than 7.

Q. What do you use to make the comics?
A. Microsoft Office Visio Premium 2010. Under construction it looks like this:

One of the Have U Rebooted Yet comics under construction

Q. Why don’t you draw the comics by hand?
A. For several reasons:

  1. I’m lazy.
  2. This is a hobby, not a day job.
  3. Visio is fun.
  4. When I draw with MS Paintbrush they tend to look like this…

    i_cant_draw

    …which usually frightens little children.

  5. But mostly, I’m lazy.

Thanks for the great questions, and thanks for checking out the blog.

VN:F [1.9.20_1166]
Rating: 0.0/10 (0 votes cast)