Show Exchange Message Size Limits in SBS 2008/2011

Full mailboxIt seems like every month I get a call about someone not being able to send or receive an email due to size limits. If you know where all the limits are in the Exchange Management Console (and if you’re aware of the 30% bloating that happens with email attachments) you can usually resolve that issue pretty quickly. If you’re new to Exchange, or a bit rusty, it might take longer.

Here’s a way to see all of your Exchange attachment limits in one screen.

Simple PowerShell Script to Show Exchange Message Size Limits

1. Copy and paste the following commands into Notepad.exe:

get-transportconfig | ft maxsendsize, maxreceivesize
get-receiveconnector | ft name, maxmessagesize
get-sendconnector | ft name, maxmessagesize
get-mailbox |ft Name, Maxsendsize, maxreceivesize

2. Save that text document with a .PS1 file extension, and you now have your PowerShell file. I named my file “email_limits.ps1”.

Example contents of file email_limits.ps1:Contents of file email_limits.ps1

Note: You can reuse this .PS1 file on any SBS 2008 (Exchange 2007) or SBS 2011 (Exchange 2010) servers.

3. Copy that file to your SBS server in a folder on the C: or D: drive.
I use a folder called “Scripts” on the D: drive.

4. Right-click the Exchange Management Shell and Run as Administrator.
Open Exchange Management Shell using Run as administrator
(Say Yes to any User Account Control prompt, if needed.)

5. In the Powershell window type the name of your .PS1 file (including the full path) and hit Enter.
Example: D:\scripts\email_limits.ps1

RESULTS

Example 1
SBS 2008 / Exchange 2007 (showing increased limits for a true 20 MB)*
Output of email_limits.ps1 on SBS 2008 / Exchange 2007

Example 2
SBS 2011 / Exchange 2010 (w/ factory defaults)
Output of email_limits.ps1 on SBS 2011 / Exchange 2010

*As you can see from Example 1, the Fax connector is still set at 10 MB, but the other limits have been changed to 29257 KB to allow for true 20MB attachments with the attachment bloating.
Formula for calculating overhead: (x MB * 1024) /.70 = limit in KB
Example: (20 MB x 1024) /.70 = 29257KB

Of course, you can also use PowerShell to change the limits, but I don’t have a script saved for that because the Set-ReceiveConnector, Set-SendConnector, etc.  commands require that the server name be included in the script.
Example: Set-ReceiveConnector “Windows SBS Internet Receive Servername” –MaxMessageSize 29MB

If I need to change the limits, I still just go old school and use the GUI in the Exchange Management Console.

Remember – there are four common places in Exchange where the email attachment size could be limited:

  1. Transport limit
  2. Receive limit
  3. Send limit
  4. Mailbox limit

We’ll show you where each one of those is located.

Exchange 2007 / 2010 Management Console Size Limit Locations

  • 1. Transport Limit

    Exchange Management Console | Organization Configuration | Hub Transport | Global Settings | Transport Settings | Properties | General | Transport Limits

    Attachment limit for Exchange Transport settings

    Note: a blank transport limit box means ‘unlimited’.

  • 2. Receive Limits
    (In SBS 2008 or 2011 there are typically 3 Receive Connectors)

    Location of Exchange 2010 Receive Connectors

    Exchange Management Console | Server Configuration | Hub Transport | Receive Connectors | right-click the receive connector | Properties | General | Maximum Message Size (KB)

    Attachment limit for Exchange Receive settings

    Note: The “Default {servername}” is your internal / .local connector.
    The “Windows SBS Internet Receive {servername}” is your external / .com connector. You’ll notice the difference in the Properties window on the FQDN line – one is .local and the other is .com/.org/etc.

    Also, regarding the internal connector, you may sometimes need to increase your “Default {servername}”(.local) connector to accommodate on-site scanners / multi-function copiers that scan to PDF and email internal employees. If so, this is where you do it. Just make sure the employees can receive attachments that large.

  • 3. Send Limit

    Exchange Management Console | Organization Configuration | Hub Transport | Send Connectors | Windows SBS Internet Send {servername} | Properties | General | Maximum Message Size (KB)

    Attachment limit for Exchange Send connector

  • 4. Mailbox Limits

    Exchange Management Console | Recipient Configuration | Mailbox | {username} | Properties | Mail Flow Settings | Message Size Restrictions | Properties | Maximum Message size (in KB)

    image

    Message size limits per for an individual user

    Note: a blank message size limit box means ‘unlimited’, but the user will still be restricted by the other the limits (shown in 1-3 above).

Bottom line: Use the sample .PS1 script to quickly make sure that all limits are set properly. Life is too short to dig through the GUI and check 4 or 5 locations manually if you don’t have to.

If you have any feedback or helpful PowerShell scripts that relate to email limits in Exchange 2007 or 2010, please feel free to post them in the comments.

More details: Official SBS Blog

VN:F [1.9.20_1166]
Rating: 10.0/10 (24 votes cast)

Exchange 2007 SP2 on SBS 2008

Exchange 2007 Microsoft has (finally) released the wrapper / installation tool for the Exchange 2007 SP2 install on SBS 2008 (and there was much rejoicing!) Previously, if you tried to install SP2 for Exchange on SBS 2008 you had to start messing with the registry per KB 973862. Thankfully, that’s no longer necessary with the installation tool. You can download it from the Microsoft download site.
 
Title: Microsoft Exchange Server 2007 SP2 Installation Tool for Windows SBS 2008
Date Published: 12/28/2009
Download size: 604 KB
File name: SBS2008-KB974271-ENU.msi
Download URL: Click here

Overview:
The Microsoft Exchange Server 2007 SP2 Installation Tool for Windows SBS 2008 provides a step-by-step wizard that simplifies the installation of Service Pack 2 for Microsoft Exchange Server 2007 on a computer that is running Windows SBS 2008. The wizard also detects and helps you repair some problems that are common during installation. Without this tool, Windows SBS 2008 administrators must follow a series of manual steps, which are outlined in the Microsoft Knowledge Base article You cannot install Exchange Server 2007 Service Pack 2 on a Windows Small Business Server 2008-based computer.

Installation, Step-by-Step:

First, downloaded Exchange 2007 SP2. Pack a lunch, because this baby is big (884 MB)! You can download SP2 here: http://www.microsoft.com/downloads/details.aspx?FamilyID=4C4BD2A3-5E50-42B0-8BBB-2CC9AFE3216A&displaylang=en 

Second, double-click the E2K7SPEN64.exe to extract it, but DON’T start the install of the service pack yet.
image

Once that’s done (and you’ve downloaded the Installation Tool above) the rest of the installation is almost ready to go. One more important note first.

Note: It goes without saying, but make sure you have a good backup of the server before applying any service packs. Seriously folks.

1. Run the MESIT installer, accept the EULA and click Next.
Accept the EULA - Next

2. Accept the default installation path and click Next.
Accept the default install location - Next

3. At the User Account Control prompt, click Continue.
User Account Control - Continue

4. Once installation of the wrapper is complete, the “Install Microsoft Exchange Server 2007 SP2 now” option should already be checked. Click Finish.
MESIT install complete - Finish

5. This will pop another UAC prompt, click Continue.
User Account Control - Continue

Note:

5a. You may be prompted to install the Windows Installer 4.5 available at http://go.microsoft.com/fwlink/?LinkId=151819 if so, click OK.
Error - You need to install the Microsoft Windows Installer 4.5 - OK
This will exit the SP2 install and you’ll need to download and install the Windows Update Standalone Installer 4.5 first. The download you need for SBS 2008 is file “Windows6.0-KB942288-v2-x64.msu” (2.94 MB).

5b. After downloading the installer, double-click it to run it, and if prompted by User Account Control, click Continue.
User Account Control - Continue

5c. The installer searches for updates,
Searching for updates 
and click OK when prompted to install Hotfix for Windows (KB942288).
Install Hotfix 942288 - OK

The installer runs by itself…
Installer runs by itself
… and will require a server restart when complete.

5d. Reboot your SBS 2008 server.
Installation complete - Reboot

5e. After the reboot is complete, log back into your server, click Start | Windows Small Business Server Tools | Microsoft Exchange Server 2007 SP2 Installation Tool to continue with the install and pickup at step 6 below.
Re-launch the MESIT

6. Browse to the location where you extracted the Exchange 2007 SP2 files and click OK.
Browse to expanded Exchange 2007 SP2 files 

7. At the “Install Service Pack 2 for Microsoft Exchange Server 2007” screen, click Next.
Here we go - Next

The wizard will temporarily disable Microsoft Forefront Security.
Under the covers magic

8. After the server environment has been prepared, click Next.
Prep complete - Next

The Installation Tool will pop up a dialog box telling you not to close the window (not that you could because Next, Cancel and the X are grayed out). Ignore this window.
Ignore this window until SP2 wizard is complete and closed

You want the 2nd window that pops up.

9. Click the Install Microsoft Exchange Service Pack 2 link.
SP2 Wizard - Install

There will be a short pause…
The waiting is the hardest part 
…and then the wizard will launch.

10. On the SP2 setup screen, click Next.
Introduction - Next

11. Accept the EULA, and click Next.
Accept the EULA - Next

12. After the readiness check is complete, (takes 1-2 minutes) if all of your prerequisites are green, click Upgrade.
Prerequisites OK - Upgrade

The service pack installation will go through several stages:

  • Organization Preparation (5 minutes)*
  • Preparing Setup (3 minutes)
  • Remove Exchange Files (21 minutes)
  • Preparing Files (1 minute)
  • Copy Exchange Files (8 minutes)
  • Hub Transport Role (9 minutes)
  • Client Access Role (3 minutes)
  • Mailbox Role (4 minutes)
  • Management Tools (1 minute)
  • Finalizing Setup (1 minutes)

Approximate time for SP2 install (excluding nearly 880 MB of downloads and reboots) was about 55 minutes, but YMMV.

*These times were on a virtual SBS 2008 install in a low-end Hyper-V server. AMD Athlon Dual Core Processor 4450B 1.22 GHz, 4 GB RAM. 

13. When the installation completes, click Finish.
SP2 installation complete - Finish 

14. Close the Exchange Server 2007 installation menu.
Close the SP2 wizard - Close

15. On the Installation Tool window, click Next.
MSIT - Next

…the wizard will re-enable Forefront and restore the default settings for the SBS Web services.
More SBS ninja in the background

16. If everything has gone smoothly, you’re out of the woods now. On the “Setup finished successfully” screen, click Finish.
MESIT is done - Finish

17. Start another backup of your server to protect all of your hard work! 🙂

VN:F [1.9.20_1166]
Rating: 0.0/10 (0 votes cast)

SBS Ports

Just because a port is open in RRAS or ISA (circa SBS 2003) doesn’t mean that it isn’t being blocked elsewhere, like at the ISP or because port forwarding isn’t setup properly in your firewall. Sometimes you need an outside view of the external ports on your internet connection which you can secure with a service like https://cubik.com.tw/.

DISCLAIMER – Only open the ports you absolutely MUST have. Example, if you’re not running the POP3 connector or FTP, don’t open those ports! If you’re not sure about a port, check the Port/IP Lookup on Sans.org or ask someone who knows!

To check all of the commonly used SBS ports at once:

  1. Go to www.grc.com/default.htm
  2. Scroll down & click ShieldsUP!
  3. Click Proceed
  4. In the center box on that page, paste this string:
    21, 25, 80, 110, 123, 143, 220, 443, 444, 500, 987, 1701, 1723, 3389, 4125, 4500
  5. Click User Specified Custom Port Probe

image

This scan will come back with a list of ports you entered and show the status.

Sample scan of commonly used ports in an SBS environment.

Below is a handy chart that I stole from Susan and Windows IT Pro and updated a couple of times over the years.

Common Ports for Small Business Server (SBS)

TCP Port

Service

Description

21%

VN:F [1.9.20_1166]
Rating: 10.0/10 (1 vote cast)

OWA Is Horked – Missing Graphics

From the Help Desk file…

Reported Issue: Users report Outlook Web Access (OWA) ‘looks funny’ or ‘messed up’ and is missing the graphics.  The main body says “Loading…”.

There is also no screen color, just a bunch of hyperlinked boxes with red X’s.

System: Windows Server 2003, Exchange Server 2003 with Service Pack 2

Details: Here is a screen shot of the error condition

OWA is horked

Dead Ends:

  • Outlook Mobile Access is working fine
  • Event logs aren’t throwing any errors
  • ASP version is good
  • Restarting application pool didn’t help
  • Restarting IIS didn’t fix it either

Diagnosis: This was a permission issue. SSL wasn’t enabled on OWA

Resolution:

  1. Open IIS Manager
  2. Navigate to Server Name / Web Sites / Default Web Site / right-click Exchange / choose Properties.
     
    image
     
  3. Click on Directory Security, and in the Secure communications box, click Edit.
     
    image
     
  4. In the Secure Communications window, make sure Require secure channel (SSL) and Require 128-bit encryption are checked.
     
    image
     
  5. Hit OK, OK and Restart IIS

If those boxes are already checked, take a look at the NTFS permissions on the hard drive for the IIS folder.  And if you do have to eventually reinstall Outlook Web Access, be sure to check out Henrik Walther’s article, “Fixing a Damaged or Incorrectly Configured OWA 2003 Installation

VN:F [1.9.20_1166]
Rating: 9.0/10 (1 vote cast)

Will 32-bit Exchange Work on 64-bit WS2003

From the mailbag today:

Question: It is my understanding that you can’t run 32-bit Exchange on 64-bit Windows Server 2003. Is that correct?

Answer:

On 64-bit hardware w/32-bit OS, yes.
On 64-bit hardware with Windows Server 64-bit OS, no.

"The x64-based versions of Windows Server 2003 seamlessly support the running of 32-bit programs. However, on the x64-based versions of Windows, all the kernel mode components must be native 64-bit components. Therefore, all drivers must be 64-bit components.

User mode 32-bit programs are run under Windows on WOW64. WOW64 is the 32-bit emulator. However, Exchange Server 2003 will not even be installed correctly under WOW64. The primary reason is that Exchange Setup installs the 32-bit driver for the Installable File System (IFS) that is incompatible with the 64-bit kernel.

Note The information described here does not apply when you run Exchange Server 2003 on 32-bit versions of Windows Server 2003 that are installed on 64-bit hardware. You can do this on 64-bit hardware that also natively supports the running of 32-bit operating systems and programs."

Source: Microsoft KB 924046
http://support.microsoft.com/kb/924046

VN:F [1.9.20_1166]
Rating: 0.0/10 (0 votes cast)

You Must Be At Least MSFP Tall to Ride Exchange 2007

The HP iPAQ hx2795 / Office Mobile 6.1 saga continues…

No Vlad, that is not me. I'm not that cool. Episode IV – A New Lack of Hope

When we last left you, a humble iPAQ hx2795 dreamed of seeing the world of tomorrow, namely; opening Office 2007 .docx and .xlsx files, and generally kicking digital butt across the galaxy.  Alas, an evil overlord named Windows Mobile Device Center (WMDC) controlled by it’s master Windows Vista bricked our poor hero.

Yet, the Force was strong with this one, and with some fancy Googling, the iPAQ was reborn – hopefully to become more powerful than Windows Vista could ever imagine.  The future of this plucky device hangs in the balance. 

Needless to say, after the unanticipated beating WMDC handed out, I was reluctant to pick the scab and re-open the wound.  But an email from NGLB reader Leonard Lee spurred me onward and upward to try again. 

FLASH! Ah-Aaaaaaah…

Backed up the iPAQ.  Booted into XP (since WMDC in Vista is da debil), downloaded iPAQ hx2795 BIOS update 1.00.01 H (2 April 2007) and released the hounds.

Side note: While I had the hood up on the iPAQ and the HP site, I also snagged the DST fix (26 Feb 2007) and the Driver Update (25 Jan 2007). 

One soft boot later:

  • Calibrate the screen
  • Skip the crappy tutorial
  • Reset the system clock & time zone, and it’s alive. 
  • Manually entered the wifi key for the Linksys router
  • Cradled the device and copied the SSL certificate to the device
  • Removed from the cradle, clicked on the cert to install it
  • Entered the server credentials into ActiveSync
  • Started wireless Over The Air sync to the Exchange 2007 server and…

Your shipment of fail has arrived

Attention Required

Result: The security certificate on the server is invalid. Contact your Exchange Server administrator or ISP to install a valid certificate on the server.

Support code: 0x80072F0D

Certificate error, eh?  Mmmm, don’t think so pumpkin. That’s the same cert I use for RPC over HTTP on the laptop.  Anyway, no problemo. I jump over to the OWA site, grab the cert, export it, cradle, copy & paste, install cert, OTA ActiveSync and… air ball.

Microsoft TS2 stress ball to the rescue.

A little more digging. I even play MacGyver and make my own CAB out of the cert. Bring the cooked cert into the device, install, he shoots, he… no dice.

Phone-A-Friend

I ping my favorite Exchange MVP. We chat on IM about the certs. And he mentions that Exchange 2007 won’t support Windows Mobile 5 devices without the Messaging & Security Feature Pack (MSFP). What the deuce?

I re-check the HP site for anything with Build 14847 or higher, no joy.  I decide to try one last thing and use the HP 24x7x365 online chat. (Stop laughing).  I take my “5 minutes or less” HP Instant Support Professional Edition wait-time to copy several movies (Simpsons & Mr. Bean) over to an SD card.  I check Twitter.com to catch up.

My support technician finally comes online.

[Wednesday, December 26, 2007 11:23 PM] — Issa K says:
Hello Tim, thank you for contacting HP and for your interest in our Active Chat online support. My name is Issa and I see you have a question regarding your iPaq Handheld. I’m going to take a few moments to review your information and will message you back very soon.

[Wednesday, December 26, 2007 11:24 PM] — Issa K says:
It looks like you have the latest ROM updates for your unit. Any further updates I would recommend checking at www.hp.com and under software and driver downloads for your unit of IPaq.

[Wednesday, December 26, 2007 11:25 PM] — Tim Barrett says:
So, there is no MSFP support for the iPAQ hx2795?

[Wednesday, December 26, 2007 11:26 PM] — Issa K says:
Doesn’t look like according the page, that is one available for the hx2000 series.

[Wednesday, December 26, 2007 11:26 PM] — Tim Barrett says:
Thank you

Result

lolcats_dave

Game, set, match.

So, there’s nothing left to do but reset the iPAQ to sync the Exchange data off the laptop. At least I can sync via Bluetooth if I want.

Unfortunately, the dream of Office 2007 documents and Exchange 2007 syncing on an iPAQ hx2795 is officially dead.  Wish I had better news for you Leonard. 🙁

Take us home Weezer.  (I picked the ‘Hispanic Wedding’ version of “Island in the Sun” because the Spike Jonze version has a monkey in it.  Nuff said…)

VN:F [1.9.20_1166]
Rating: 0.0/10 (0 votes cast)

Using an iPhone with SBS 2003

iphone_emailYes, you’re on the right blog. Don’t freak.

Not too long ago, a customer with a shiny new iPhone called and wanted to get it hooked up to their Small Business Server 2003 server.  No biggie, right?  Well, POP3 is one thing, but little did I know then that IMAP on SBS with an iPhone was pretty much uncharted territory. 

It took a fair amount of research, lots of experimentation, plenty of help from
Eriq Neale [SBS-MVP], and an enormous amount of patience since the client with the phone was 500 miles away and we were doing this blind.  (Yikes!)

I’m happy to report that the iPhone does work with SBS using IMAP with SSL.
(Although Windows Mobile 5 or 6 with Small Business Server is still the preferred tool for mobile SBS Warriors).

Want to set this up for yourself?  No problemo – there are two phases:

Phase 1 – Setting up IMAP with SSL on the SBS box
(complete with screen shots).

"Configuring IMAP over SSL with SBS 2003 Standard"

Co-authors: Eriq Neale & Tim Barrett

http://www.smallbizserver.net/Default.aspx?tabid=266&articleType=ArticleView&articleId=231

As a reminder, make sure you open ports 143 (TCP) and 993 (TCP) in your firewall and forward it back to your SBS box.

These instructions are for SBS 2003 Standard.

UPDATE: Eriq has also completed the ISA version of the instructions for SBS 2003 Premium.

Phase 2 – Setting up your iPhone to work with SBS and IMAP
(complete with screen shots stolen from UW and modified).

Disclaimer: This document and what comes with it are provided as-is with blunt warning: Use at your own risk, buyer beware. You break your system; you own the resolution as well. We have no liability for what you do, or can’t do, or fail to do with this information. Your entire protection is to start over again with a protected backup, or from protected system. If you don’t want to accept this idea, please don’t use this document.

Create a New Account in iPhone Mail

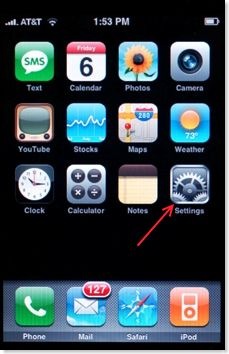
  1. Select Settings on the home screen

    iphone01 

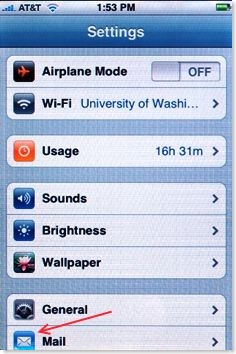
  2. Select Mail to start iPhone Mail

    iphone02 

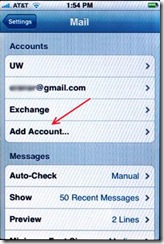
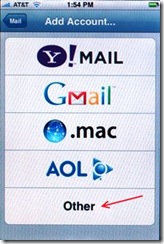
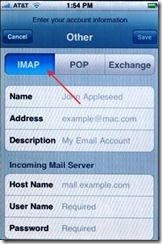
  3. Touch Add Account, select Other and then IMAP

    iphone03   iphone04  

    iphone05

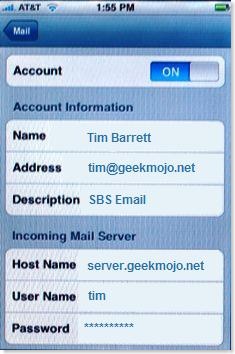
  4. Fill in your account information as follows:

      Account Information:

    Name: Your Real Name
    Address: username@domain.com
    Description: SBS Email (Just a suggestion)

      Incoming Mail Server:

    Host Name: server.domain.com
    User Name: username (Not domain\username)
    Password: yourSBSpassword

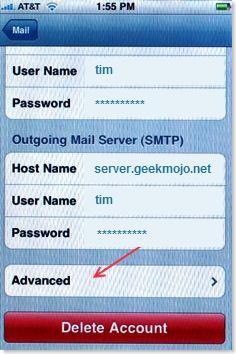
      Outgoing Mail Server (SMTP):

    Host Name: server.domain.com (:587)
    User Name: username (Not domain\username)
    Password: yourSBSpassword

    This page should now look like this:

    iphone08 

  5. Touch Advanced to configure security options.

    iphone09

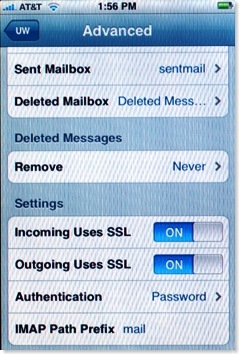
  6. The following screen will appear.

    iphone11 

    I used the following settings for SSL on the iPhone:

    Incoming Uses SSL – On
    Outgoing Uses SSL – On

UPDATE: Props to Levent for reminding me that you need to make sure that both ports 143 and 993 open and forwarded to the SBS box. The instructions are in the whitepaper, but I didn’t have inbound 993 turned open in my initial configuration, which is why I couldn’t get the iPhone to pull down email via IMAP with the ‘Incoming uses SSL’ turned on initially. Thanks for catching that Levent!

So there you have it.  Thanks to Eric Neale for his amazing patience and Mac & SBS know-how!  And thanks to Susan for the link. 🙂

If you have suggestions or comments, hit the feedback button below.  And before folks ask, my "Running FolderShare as a Windows Service on SBS" is coming next.

VN:F [1.9.20_1166]
Rating: 0.0/10 (0 votes cast)

Message is Larger Than the Current System Limit

From the Help Desk file…

A client running SBS is having problems with large attachments bouncing.  They are using SMTP, not POP3:

  • Each month they get a a particular inbound email from an external sender w/ a sizeable attachment
  • Last month the attachment was 7,403 KB and it was delivered just fine
  • This month the attachment was 7,562 KB and it was rejected

Error Message:

“The following recipient(s) could not be reached: This message is larger than the current system limit or the recipient’s mailbox is full. Create a shorter message body or remove attachments and try sending it again.”

Gut Reaction:

The ultimate computer troubleshooting question – “What changed?” 

The attachment is bigger (but not much).  And it’s likely that the users mailbox has grown in the last month, right?  Well, not so fast.

Server Settings:

  • Mailbox Store Storage Limits:  Warn @ 175 MB / Prohibit @ 200 MB
  • Client mailbox size:  22 MB
  • Default SMTP Virtual Server Properties: Limit message to size (KB) is unchecked
  • Exchange Delivery Defaults:  10,240 KB send / 10,240 KB receive
  • User Delivery Defaults:  10,240 KB send / 10,240 KB receive

So the attachment is well below the 10 MB limit, and the user has plenty of storage space.  What gives?

The Smoking Gun:

I did some research and found the following KB Article:

“How to set size limits for messages in Exchange Server”
http://support.microsoft.com/kb/322679

Note The size of SMTP messages that are sent between routing groups and to the Internet increase by about 30 percent if they contain binary attachments or other 8-bit data.”

Yeah – you read that right, 30% overhead for SMTP email attachments. 

Let’s do the math – a 7,562 KB attachment with a 30% increase (7,562 / 0.7) = 10,802 KB.  And that’s larger than 10,240 KB folks!  I talked to Vlad for validation, and after the obligatory mocking session, he confirmed that’s about right for the overhead.  He also said something about an 8-bit attachment going through a 7-bit system, but that’s over my head.

Resolution:

I bumped the limits up to 15,360 KB, so they should be able to receive a 10,752 KB attachment (a true 10 MB), sent another test email, and it worked!

So here’s a rough conversion chart of what your settings need to be to get ‘true’ attachment sizes through the server:

Physical Attachment / Actual Height Needed

  • 5 MB / 7,200 KB
  • 6 MB / 8,600 KB
  • 7 MB / 10,00 KB
  • 8 MB / 11,400 KB
  • 9 MB /12,900 KB
  • 10 MB /14,300 KB
  • 11 MB /15,700 KB
  • 12 MB /17,100 KB
  • 13 MB /18,600 KB
  • 14 MB /20,000 KB
  • 15 MB /21,400 KB

To plug in that setting, just navigate to:

Server Management / Advanced Management /  Exchange / Global Setting / Message Delivery / Properties / Defaults tab:

I hope that helps somebody.  And thanks Vlad, my favorite Exchange MVP 🙂

VN:F [1.9.20_1166]
Rating: 8.5/10 (2 votes cast)

Unified Messaging the Xbox 360 Way

Microsoft announced yesterday (8 April 2007) that they’re opening up the Xbox LIVE IM network (6 million-strong) to the Windows Live Messenger (260 million-strong) network.

“Who cares,” you say?  Gamers, clients, employees, your kids.  Today is a travel day for Matt (hello Cleveland!) but I’m sure he cares too.  And so should you.

Think about it:

Scenario 1 (uncool) – You’re tired of playing with ios games for money and gaming away on PGR3 and your boss pops up an IM to ask how those TPS reports are coming.  Icky!

Scenario 2 (kinda cool) – Unified messaging becomes a reality with Exchange 2007, the whole ‘access anywhere’ scenario could conceivably include getting email and voicemail on your 360.

Scenario 3 (totally cool) – Knocking out those simple IM questions without getting off the couch and exiting your game.  Nice!

VN:F [1.9.20_1166]
Rating: 0.0/10 (0 votes cast)

Whitepaper – Exchange IMF v2

Whitepaper title: Microsoft Exchange Server Intelligent Message Filter v2 Operations Guide
File name: IMF_SP2.doc
Version: 1.0
Date Published: Feb 7, 2007
Language: English
Download Size: 337 KB
Pages: 42
Download URL: Click here

Overview:
Microsoft Exchange Server Intelligent Message Filter v2 helps companies reduce the amount of unsolicited commercial e-mail (UCE), also known as spam, received by users. This guide provides overall operational information to help optimize the performance of Exchange Server Intelligent Message Filter.

Whitepaper Contents:

  • Understanding Exchange Server IMF
  • Planning Your Exchange Server IMF
  • Configuring and Enabling IMF
  • Create an IMF
  • Specify Sender ID Filtering Options
  • IP Address Configuration for Sender ID Filtering
  • IP Address Configuration for Connection Filtering
  • Create a Connection Filtering Rule
  • Enable Connection Filtering
  • Enable IMF
  • Updating the Exchange Server IMF
  • Monitoring and Troubleshooting IMF
  • Customizing IMF
VN:F [1.9.20_1166]
Rating: 0.0/10 (0 votes cast)